Carline Hound Help
1. Introduction
Carline Hound is a car rider line dismissal app built for efficiency and safety. It takes the hair-pulling frustration out of organizing students for dismissal and turns it into a coordinated, predictable process.
An extremely simple app for a complex job.
The core idea: one person — the Line Walker — walks the line of cars and enters each family's rider number into the app as cars arrive. At the same time, another person — the Line Marshal — sees those families' names appear on screen in order and uses the app to dismiss students to their cars.
Two additional views support the rest of your dismissal team. The Large Display is for cafeterias, gyms, or other gathering areas where students wait. The Classroom view is for teachers dismissing students directly from their rooms.
The app requires a reliable internet connection. Each family must also be assigned a unique rider number, visible from outside the vehicle as it pulls up to the line.
Carline Hound runs on Apple iOS, Android, and any modern web browser.
Where to use the app:
- Webview (any browser): https://webview.carlinehound.com/
- iOS: Download from the App Store
- Android: Download from Google Play
The webview is especially useful for the Large Display and Classroom views, since you can run those on a desktop, laptop, smartboard, projector, or smart TV.
A note on terminology. Throughout this guide we say "tap" for the action of pressing a button or link. On a desktop browser, that's a click — same idea.
2. Requirements
Before your school can use Carline Hound, four things need to be in place.
1. The app is used by school staff, not parents or students. Carline Hound is designed for school administrators, teachers, and adult helpers whom the school has designated to assist with dismissal. Parents and students don't install or interact with the app. The school operates everything.
2. Each school needs a paid subscription. There is no limit to the number of users in a school — once a school has an active subscription, every staff member, teacher, and designated helper can use the app under that one subscription. Free trials are available for new schools to evaluate the app before subscribing.
A subscription can also include sub-schools, which let one school operate Carline Hound across multiple dismissal locations at no extra cost. See Setting Up Your School for the details.
3. Reliable internet connection for all users. The Line Walker will normally benefit from cellular data, since they tend to move away from Wi-Fi signal during their walk down the carline. The Line Marshal, Large Display, and Classroom views can run on Wi-Fi as long as the signal is reliable in their location.
4. Each family is assigned a unique rider number, visible from outside the vehicle. The number can be as simple as a digit drawn on a 3"×5" card placed in the windshield, or as polished as a printed mirror hang tag visible through the windshield. Whatever format you use, the only things that matter are that each family has a unique number and that the Line Walker can see it clearly from outside the car.
3. Getting Started
This section walks you through everything from creating an account to logging in and choosing whether to create a new school or join an existing one. Setting up your school's rider list, positions, and other details comes in the next section.
Step 1: Download or open Carline Hound
You can use Carline Hound on a phone, tablet, computer, or smart TV.
- iOS: Download from the App Store
- Android: Download from Google Play
- Web browser: Open https://webview.carlinehound.com/
Step 2: Create an account
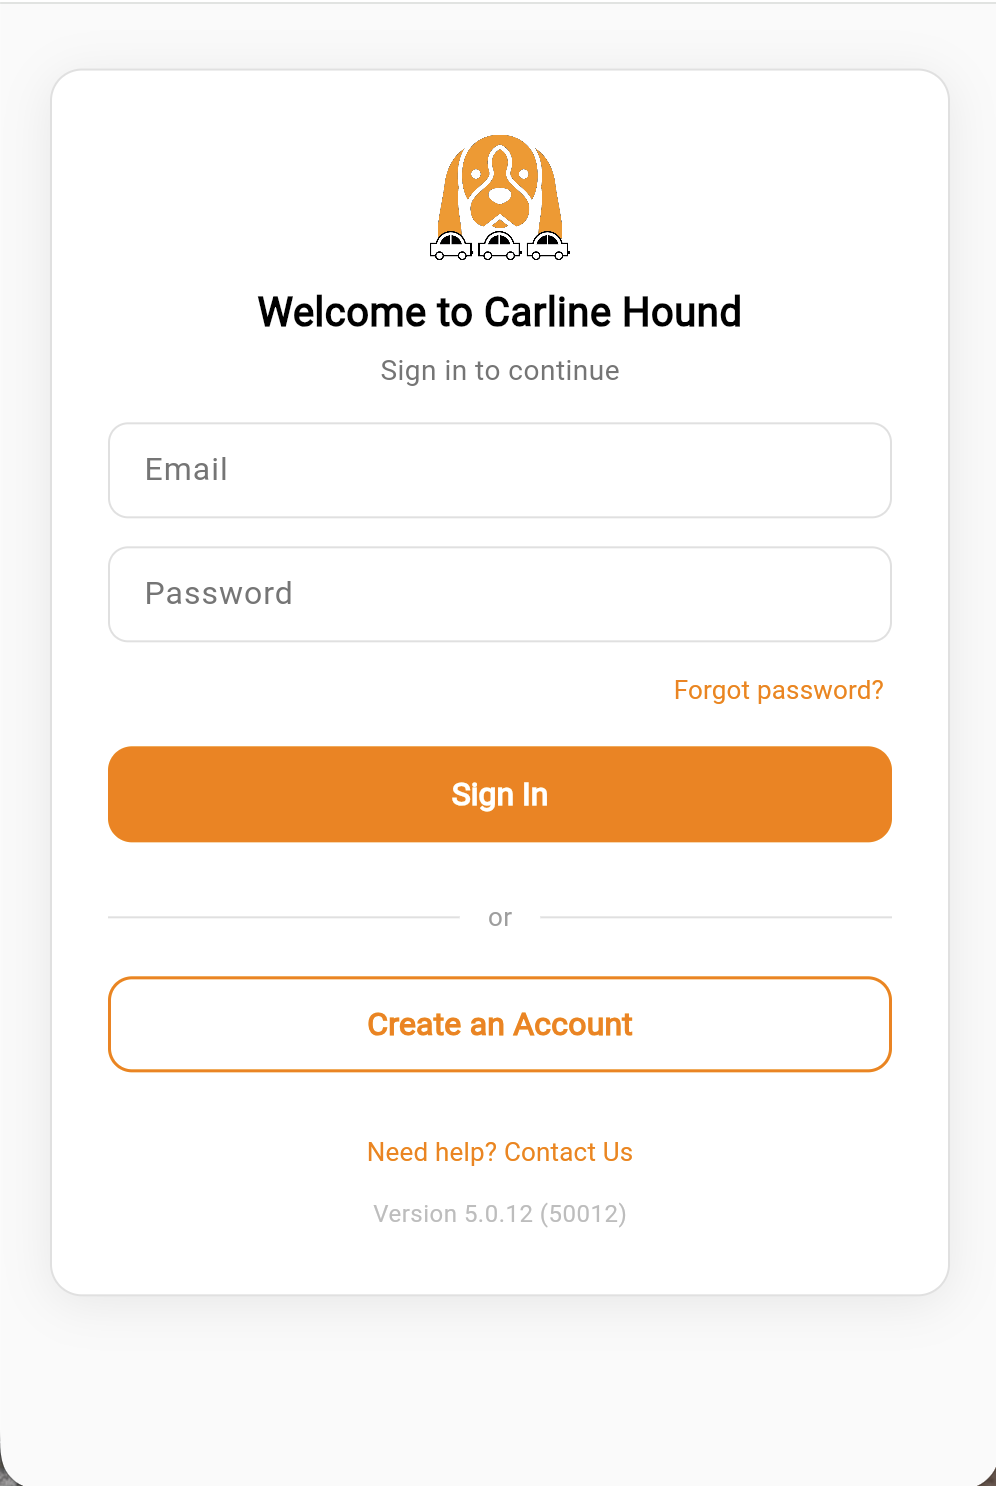
On the sign-in screen, tap Create an Account. You'll be taken to a signup form where you'll enter your name, email, and a password. Once you submit, Carline Hound will send a verification email to the address you provided.
Open that email and click the verification link. You can then return to the app and log in with the email and password you just set up.
Note: email verification. Your email needs to be verified to use the app. If you log in before verifying, the app will show you a countdown banner reminding you to verify. You'll have a limited number of logins before verification is required to continue. If you don't see the verification email, check your spam folder.
Step 3: Create a new school or join an existing one
After your first successful login, the app will ask whether you want to Create a new school or Join an existing one.
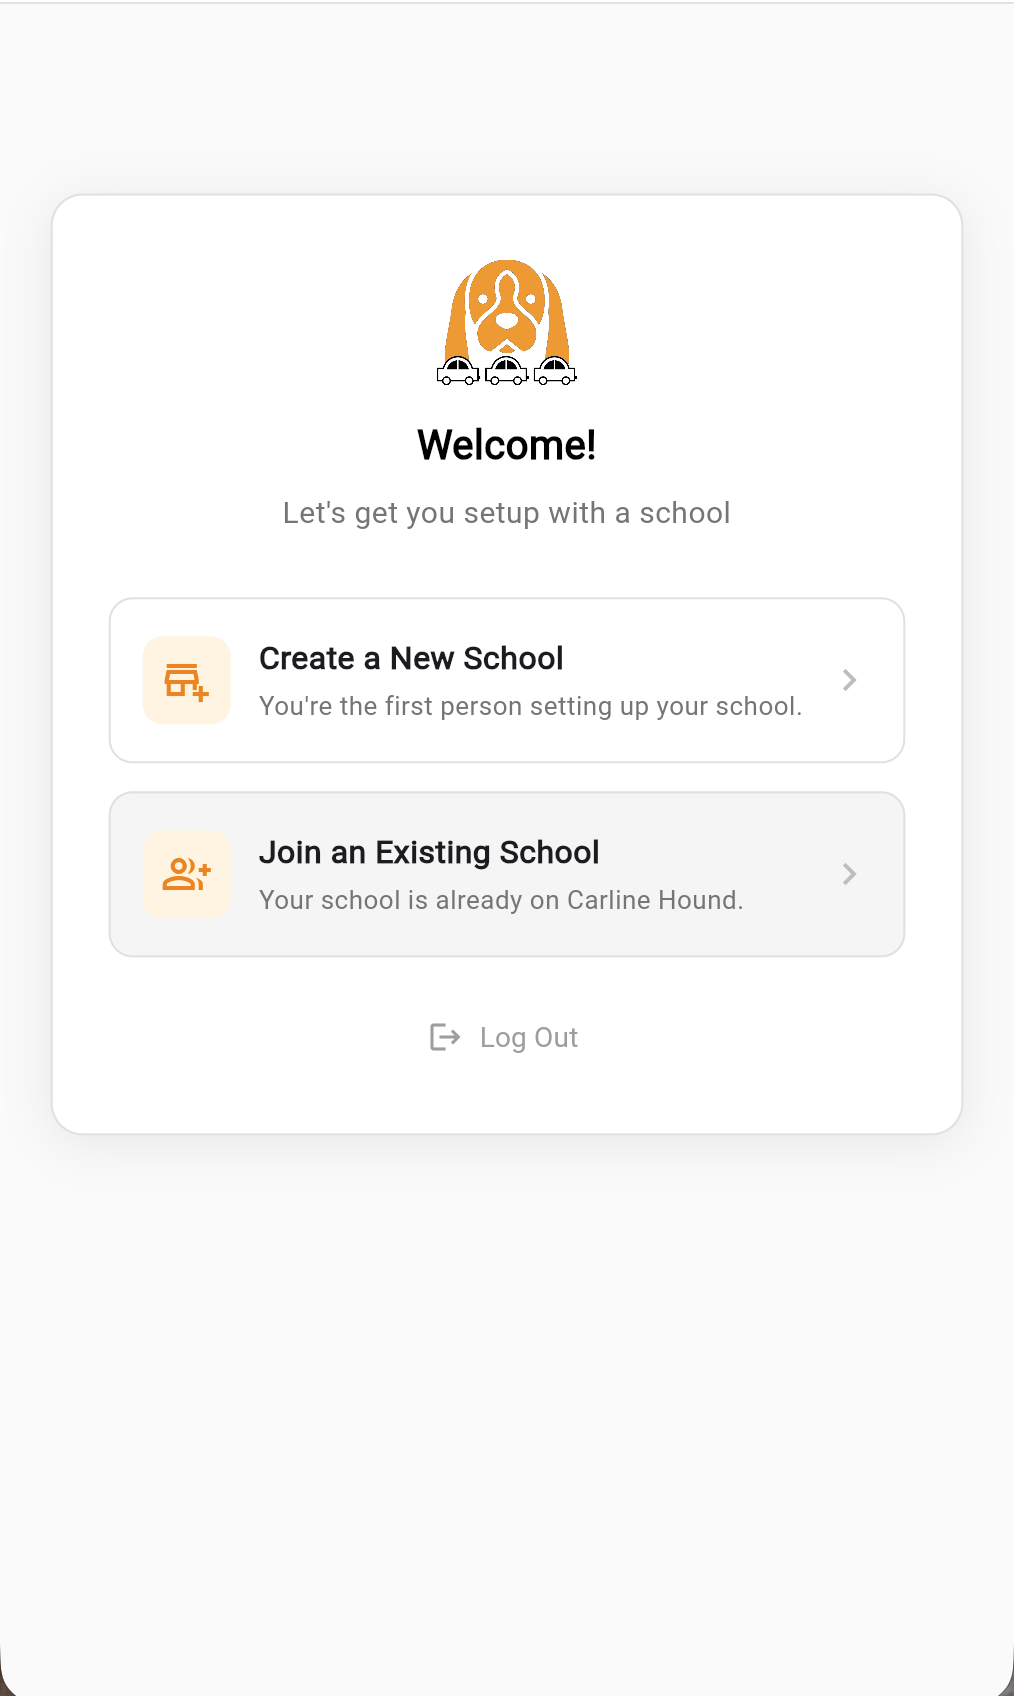
- Choose Create if you're the first person at your school setting up Carline Hound.
- Choose Join if your school already uses Carline Hound and you're being added as a user.
Creating a new school
Carline Hound uses a school directory to make setup fast. Select your state, then start typing your school's name in the search box. Suggestions will appear from the directory — choose your school from the list, and the app will automatically fill in your school's address, city, ZIP, school type, and other details.
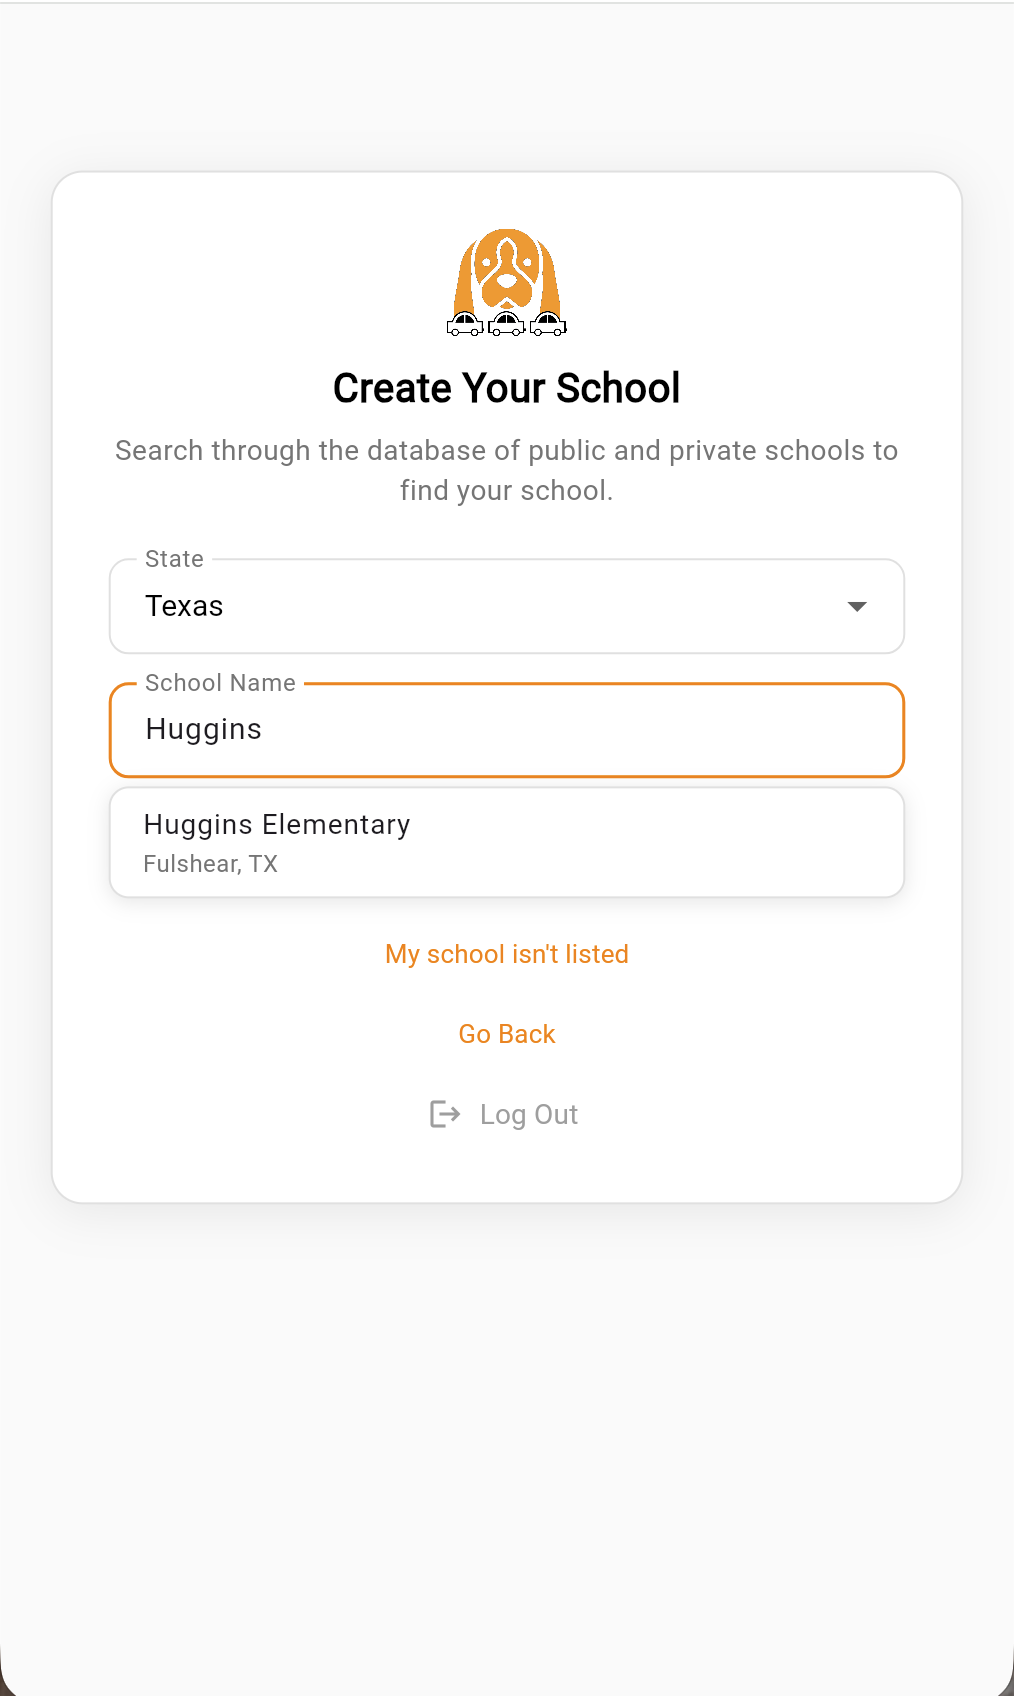
If you don't see your school in the list, choose My school isn't listed and enter the details manually.
You'll also be asked to set the number of positions at your school — this is the number of pickup spots in your car line where children can enter cars at the same time. If you can load 8 cars at once, set this to 8. Don't worry about getting this exactly right now; you can change it later in Settings.
Once your school is created, you'll be offered subscription options. Every new school gets a free trial period to test out the app — the trial length is shown when you start your trial. After the trial, or whenever you're ready, you can subscribe directly through the app or request a quote or invoice (for schools paying by purchase order or check).
Joining an existing school
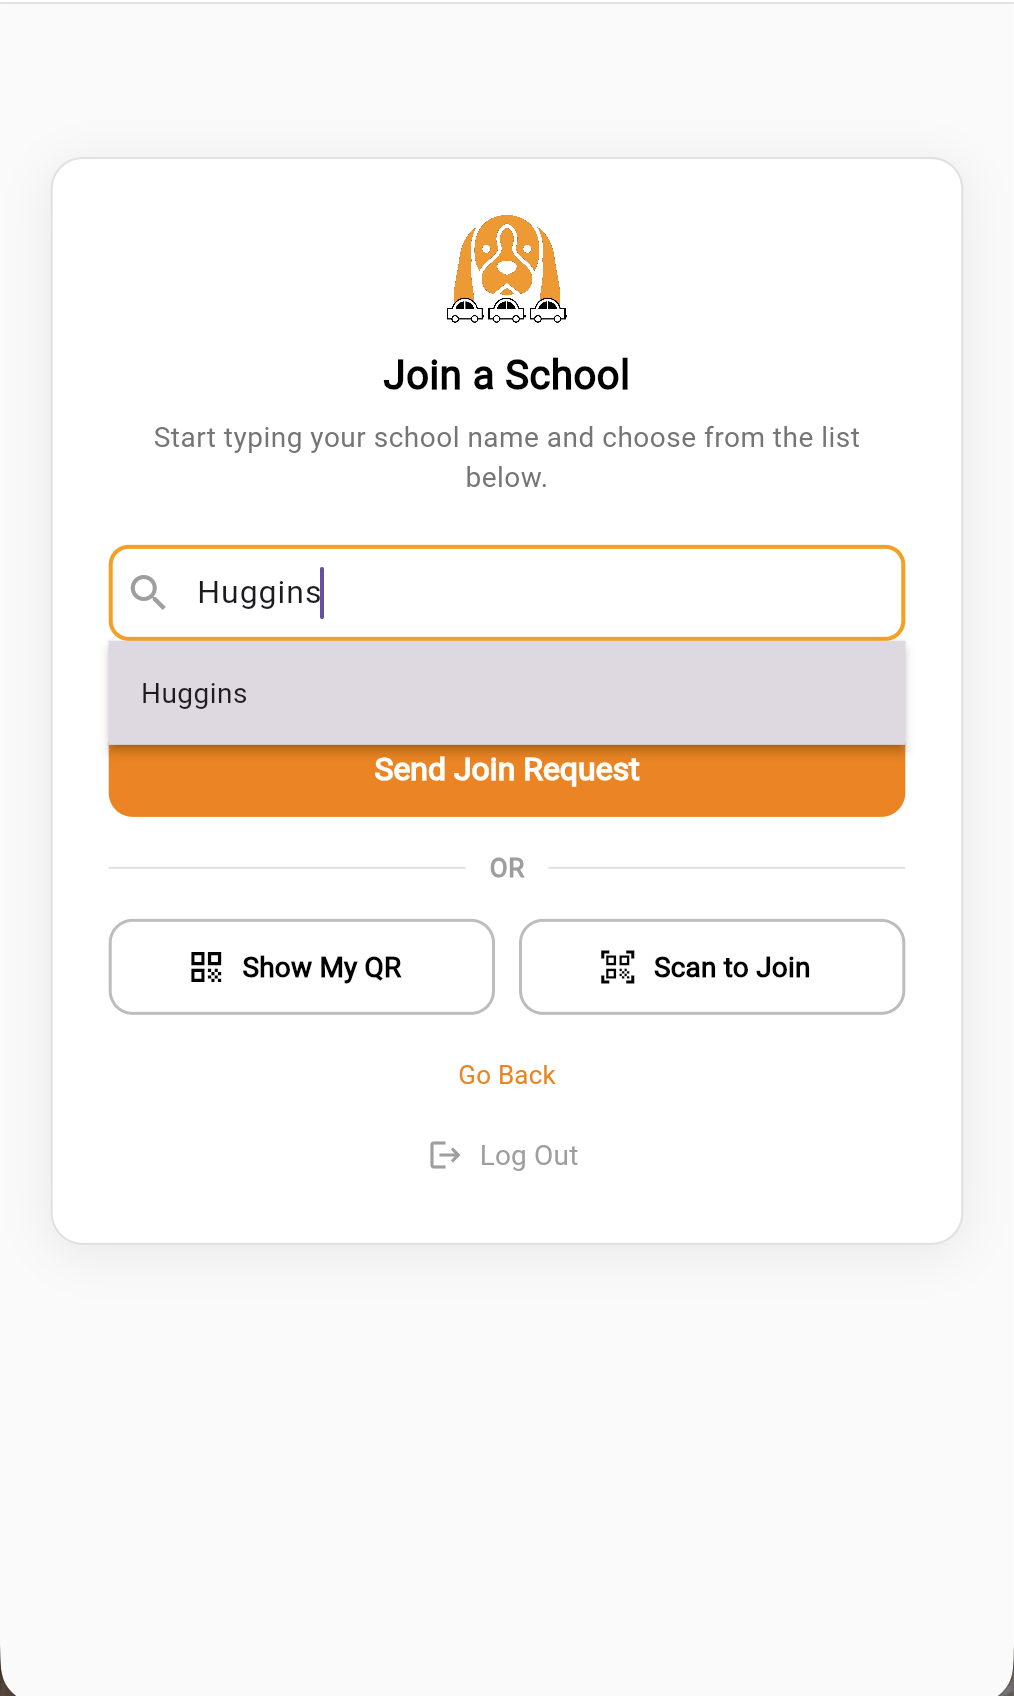
Type your school's name into the search box. As you type, matching schools that already use Carline Hound will appear — select yours and tap Send Join Request.
Your request now goes to your school's admin for approval. Until they approve you, the app will show you a Waiting for Approval screen. You don't need to log out or log back in; once your admin approves you, the app will detect it and forward you in automatically.
If you picked the wrong school, you can cancel the request and search again.
Alternative: Join with a QR code
The Join screen has two QR-based shortcuts. Both speed up joining a school in different ways.
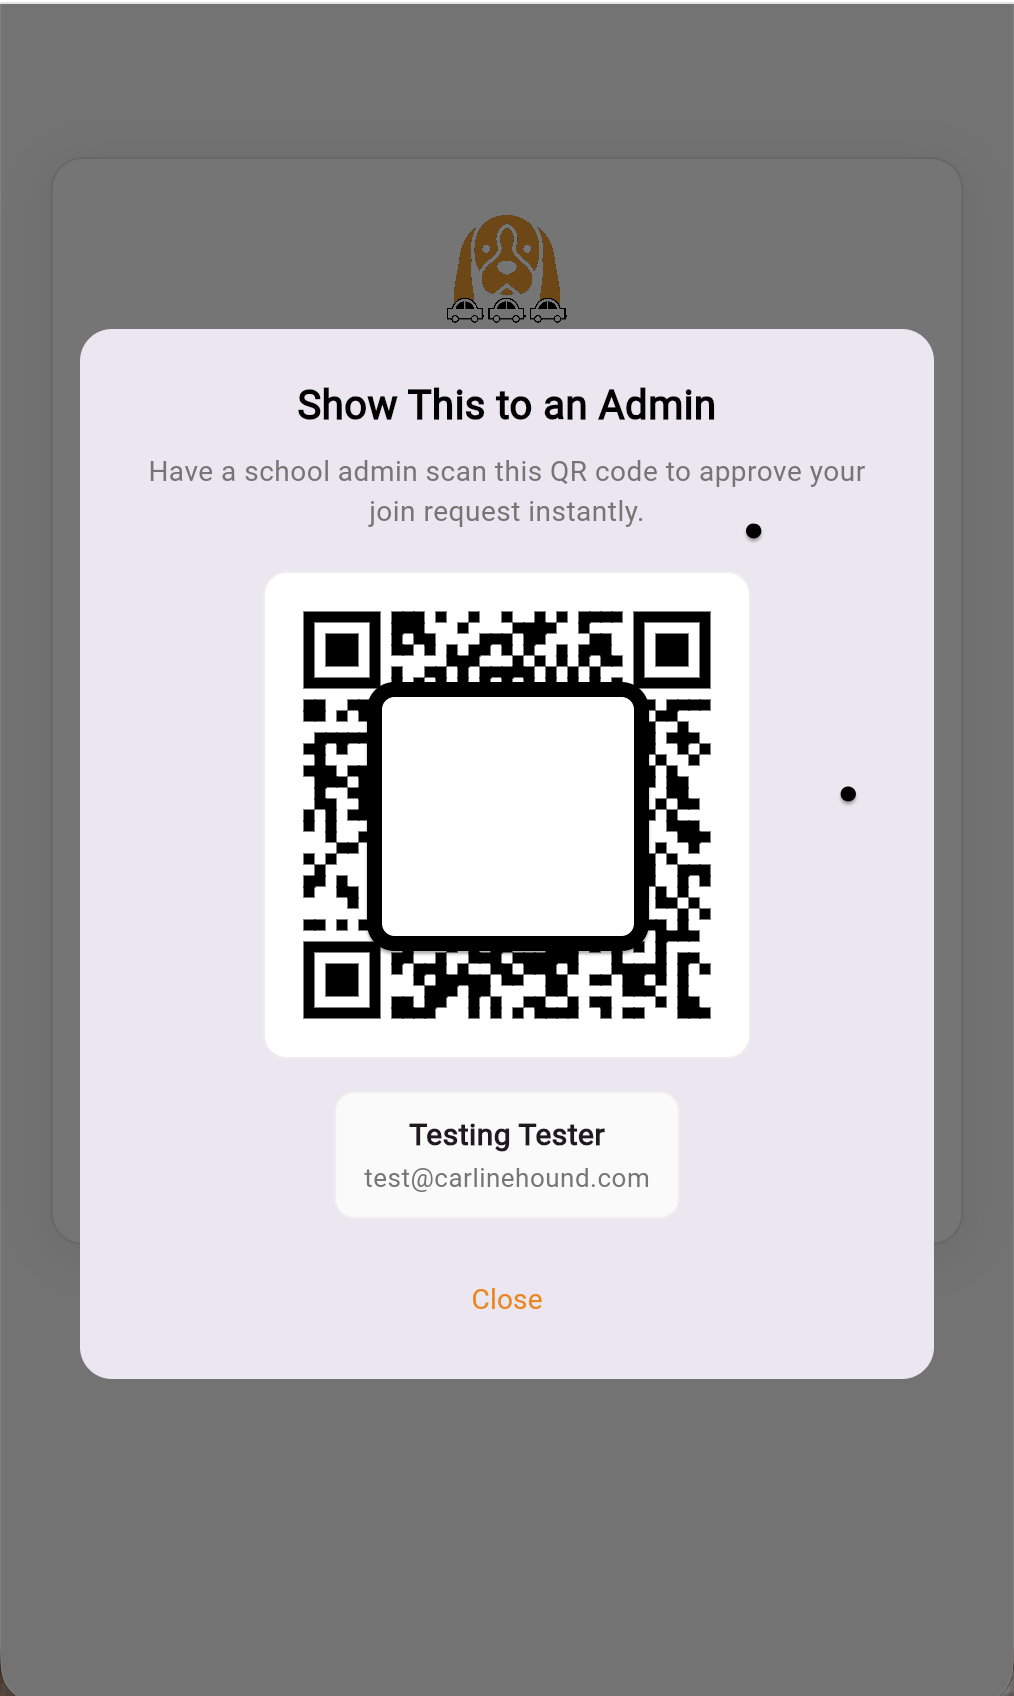
Show My QR
Tap Show My QR to display your personal QR code on screen. An admin standing next to you scans it from their phone, and your join request is approved on the spot. Use this option when you and your admin are in the same room — it's the fastest way to get approved, with no waiting on emails or notifications.
Scan to Join
Tap Scan to Join to scan a printed QR code your school has shared — for example, on a paper handout or poster. The school's name fills in automatically, so you don't have to search the directory. You'll still tap Send Join Request to finish, and your admin will approve you the normal way.
Admins can generate either QR — printable for distribution or live on their phone — from Settings. See the Settings section for details.
What happens next
Once you've created or joined a school and your account is active, you'll land on the home page. The home page shows large cards for each role — Line Walker, Line Marshal, Large Display, and Classroom — letting whoever is using that device choose their job for the day.

If you created the school, you're automatically the admin and can move on to setting up your rider list, hang tag numbers, positions, and user approvals — see Setting Up Your School next. The app comes preloaded with sample rider data, so you can open any of the role views and see how they work before uploading your real rider list. When you upload your file, the sample data is replaced.
If you joined an existing school, you're ready to use whichever role your school has assigned to you.
4. Setting Up Your School
If you created your school, you're now the admin and have access to the Settings page from the hamburger menu. This section walks through the main setup tasks: uploading your rider list, setting positions, approving users, and (if needed) creating sub-schools.
You can do these in any order, but most schools find it easiest to upload the rider list first, then approve users as they request to join, then fine-tune positions and other details once dismissal starts running.
Preparing your rider list
Each family at your school needs a unique rider number that the Line Walker will see and enter as cars pull up to the line. The rider list is how Carline Hound knows which family belongs to which number, and which teachers their children are with.
You'll prepare this list in a Microsoft Excel .xlsx file before uploading it to the app. The file format is straightforward:
| Column | Contents |
|---|---|
| A | The rider number — digits only, up to 4 digits long |
| B | The name shown to the Line Marshal — free-form text |
| C onward | One teacher's name per column — one column per child |
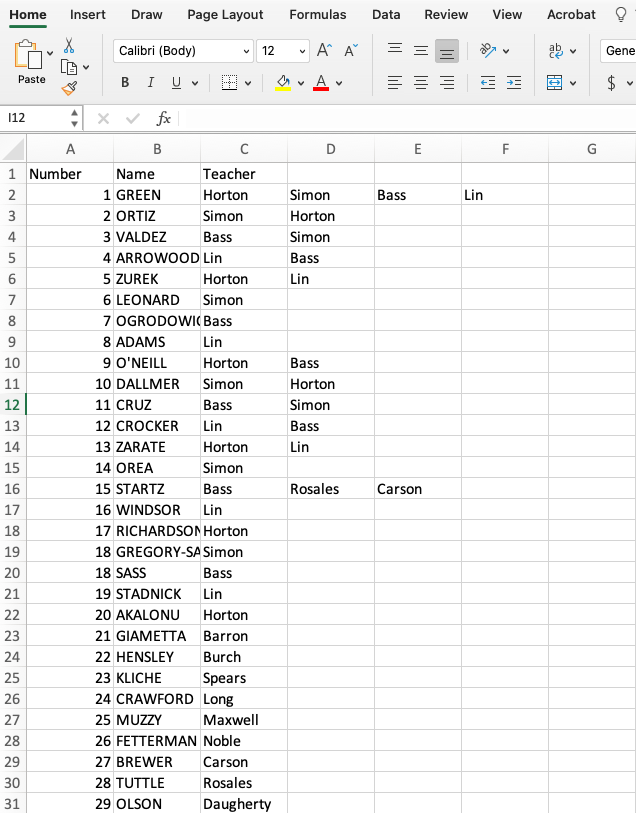
Each row is one entry. The teacher columns extend as far right as needed: a single-child entry uses just column C, a three-child entry uses columns C, D, and E. There's no fixed number of teacher columns — each entry uses as many as it needs, and the number of teachers you list tells the app how many siblings to show for that entry.
We recommend giving each column a descriptive header in row 1 (such as Number, Name, Teacher) for your own reference, but the app reads the file by column position, not by header text — so the exact wording of headers doesn't matter.
Important: no formulas anywhere in the file. Every cell must contain a plain value, not an Excel formula. A common mistake is using
=A1+1to fill rider numbers sequentially — this won't work. Type values in directly, or use Excel's drag-fill on plain values: type1,2,3in three cells, then drag the fill handle down to extend the series.
Numbers (column A)
- Digits only. Letters, dashes, and other characters aren't allowed.
- 0 to 9999. Up to four digits. Leading zeros are removed automatically (so
0042and42are the same number). - Must be unique. No two entries can share the same number.
- The number should be visible from outside the vehicle. Most schools use printed mirror hang tags; a digit drawn on a 3"×5" windshield card works just as well.
Names (column B)
The Name column is free-form. Whatever you put here is what the Line Marshal sees when that car arrives, so use whatever format makes dismissal easiest at your school. Common formats include:
| Format | Example |
|---|---|
| Last name only | SMITH |
| Last initial + last name | J. Smith |
| Full first and last name | Jane Smith |
| Multiple students, abbreviated | J., S., Smith |
| Multiple students, written out | Jane & Sam Smith |
| Grade and last name | K - Smith or 1st - Smith |
You can also assign a number to either a single student or a whole family — whichever fits your school's approach. Some schools issue one number per family (siblings share it); others issue one number per student. The app supports both.
A few practical notes
- One row per entry. If you give each family a single number, that's one row per family. If you give each student a number, that's one row per student.
- Whatever numbering scheme you use (sequential 1–200, by grade, by classroom, etc.), the only rule is that no two entries share the same number.
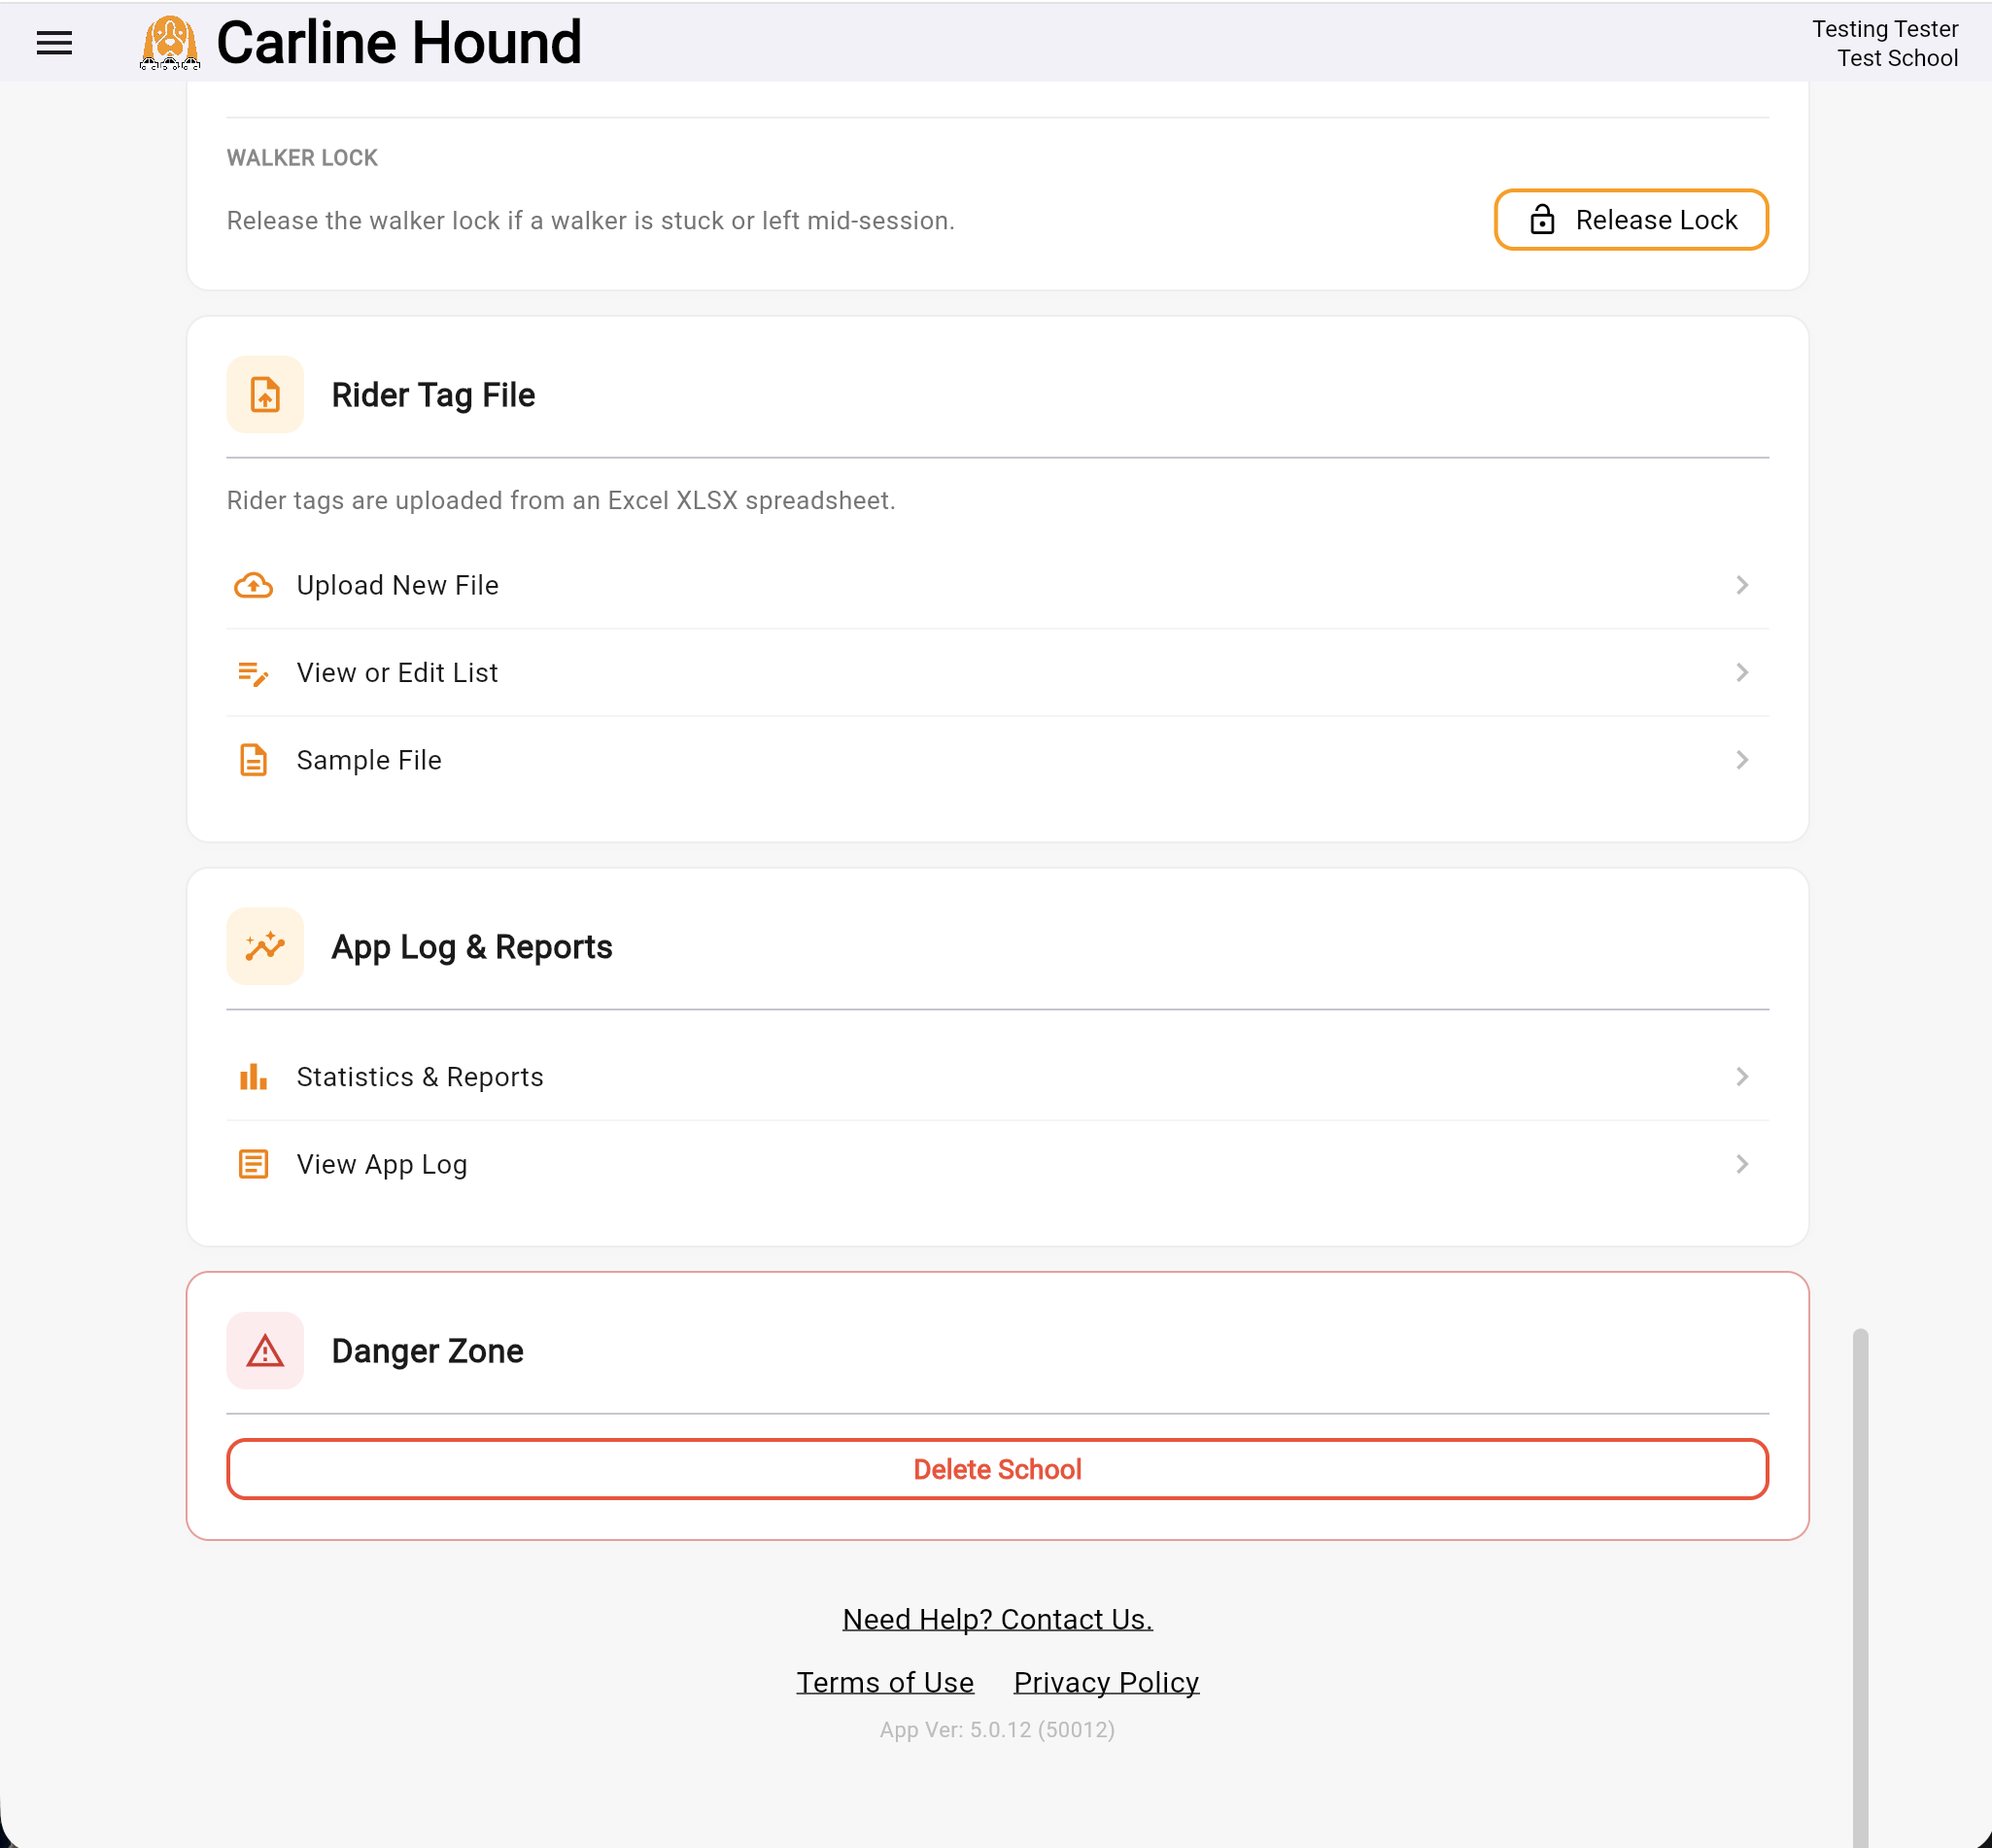
Uploading your rider list
Once your file is ready:
- Open Settings from the hamburger menu.
- In the rider list section, tap Upload New File.
- Acknowledge the warning that you're about to overwrite the existing rider list. (On a brand-new school, this overwrites the sample data the app starts with.)
- Navigate to your file and select it. Upload may take a minute or two.
- When the upload finishes, tap View or Edit List to confirm everything looks right.
Where your file needs to be:
- Webview (browser): You can upload directly from your computer — when you tap Upload New File, your computer's file picker opens and you can select the file from anywhere on your machine.
- iOS or Android app: The mobile file picker reaches into cloud storage, so place your file in iCloud, Google Drive, Dropbox, or another cloud service first, or save it to your device's local storage.
If you need to add or remove individual families later — a new family enrolls mid-year, an existing family moves away — you can do this directly from View or Edit List without uploading a whole new file. Just be careful not to assign a new family a rider number that's already in use; doing so will overwrite the existing entry.
Setting positions and dismissal mode
The Dismissal Options card in Settings controls how the dismissal queue is organized. Two settings here matter most.
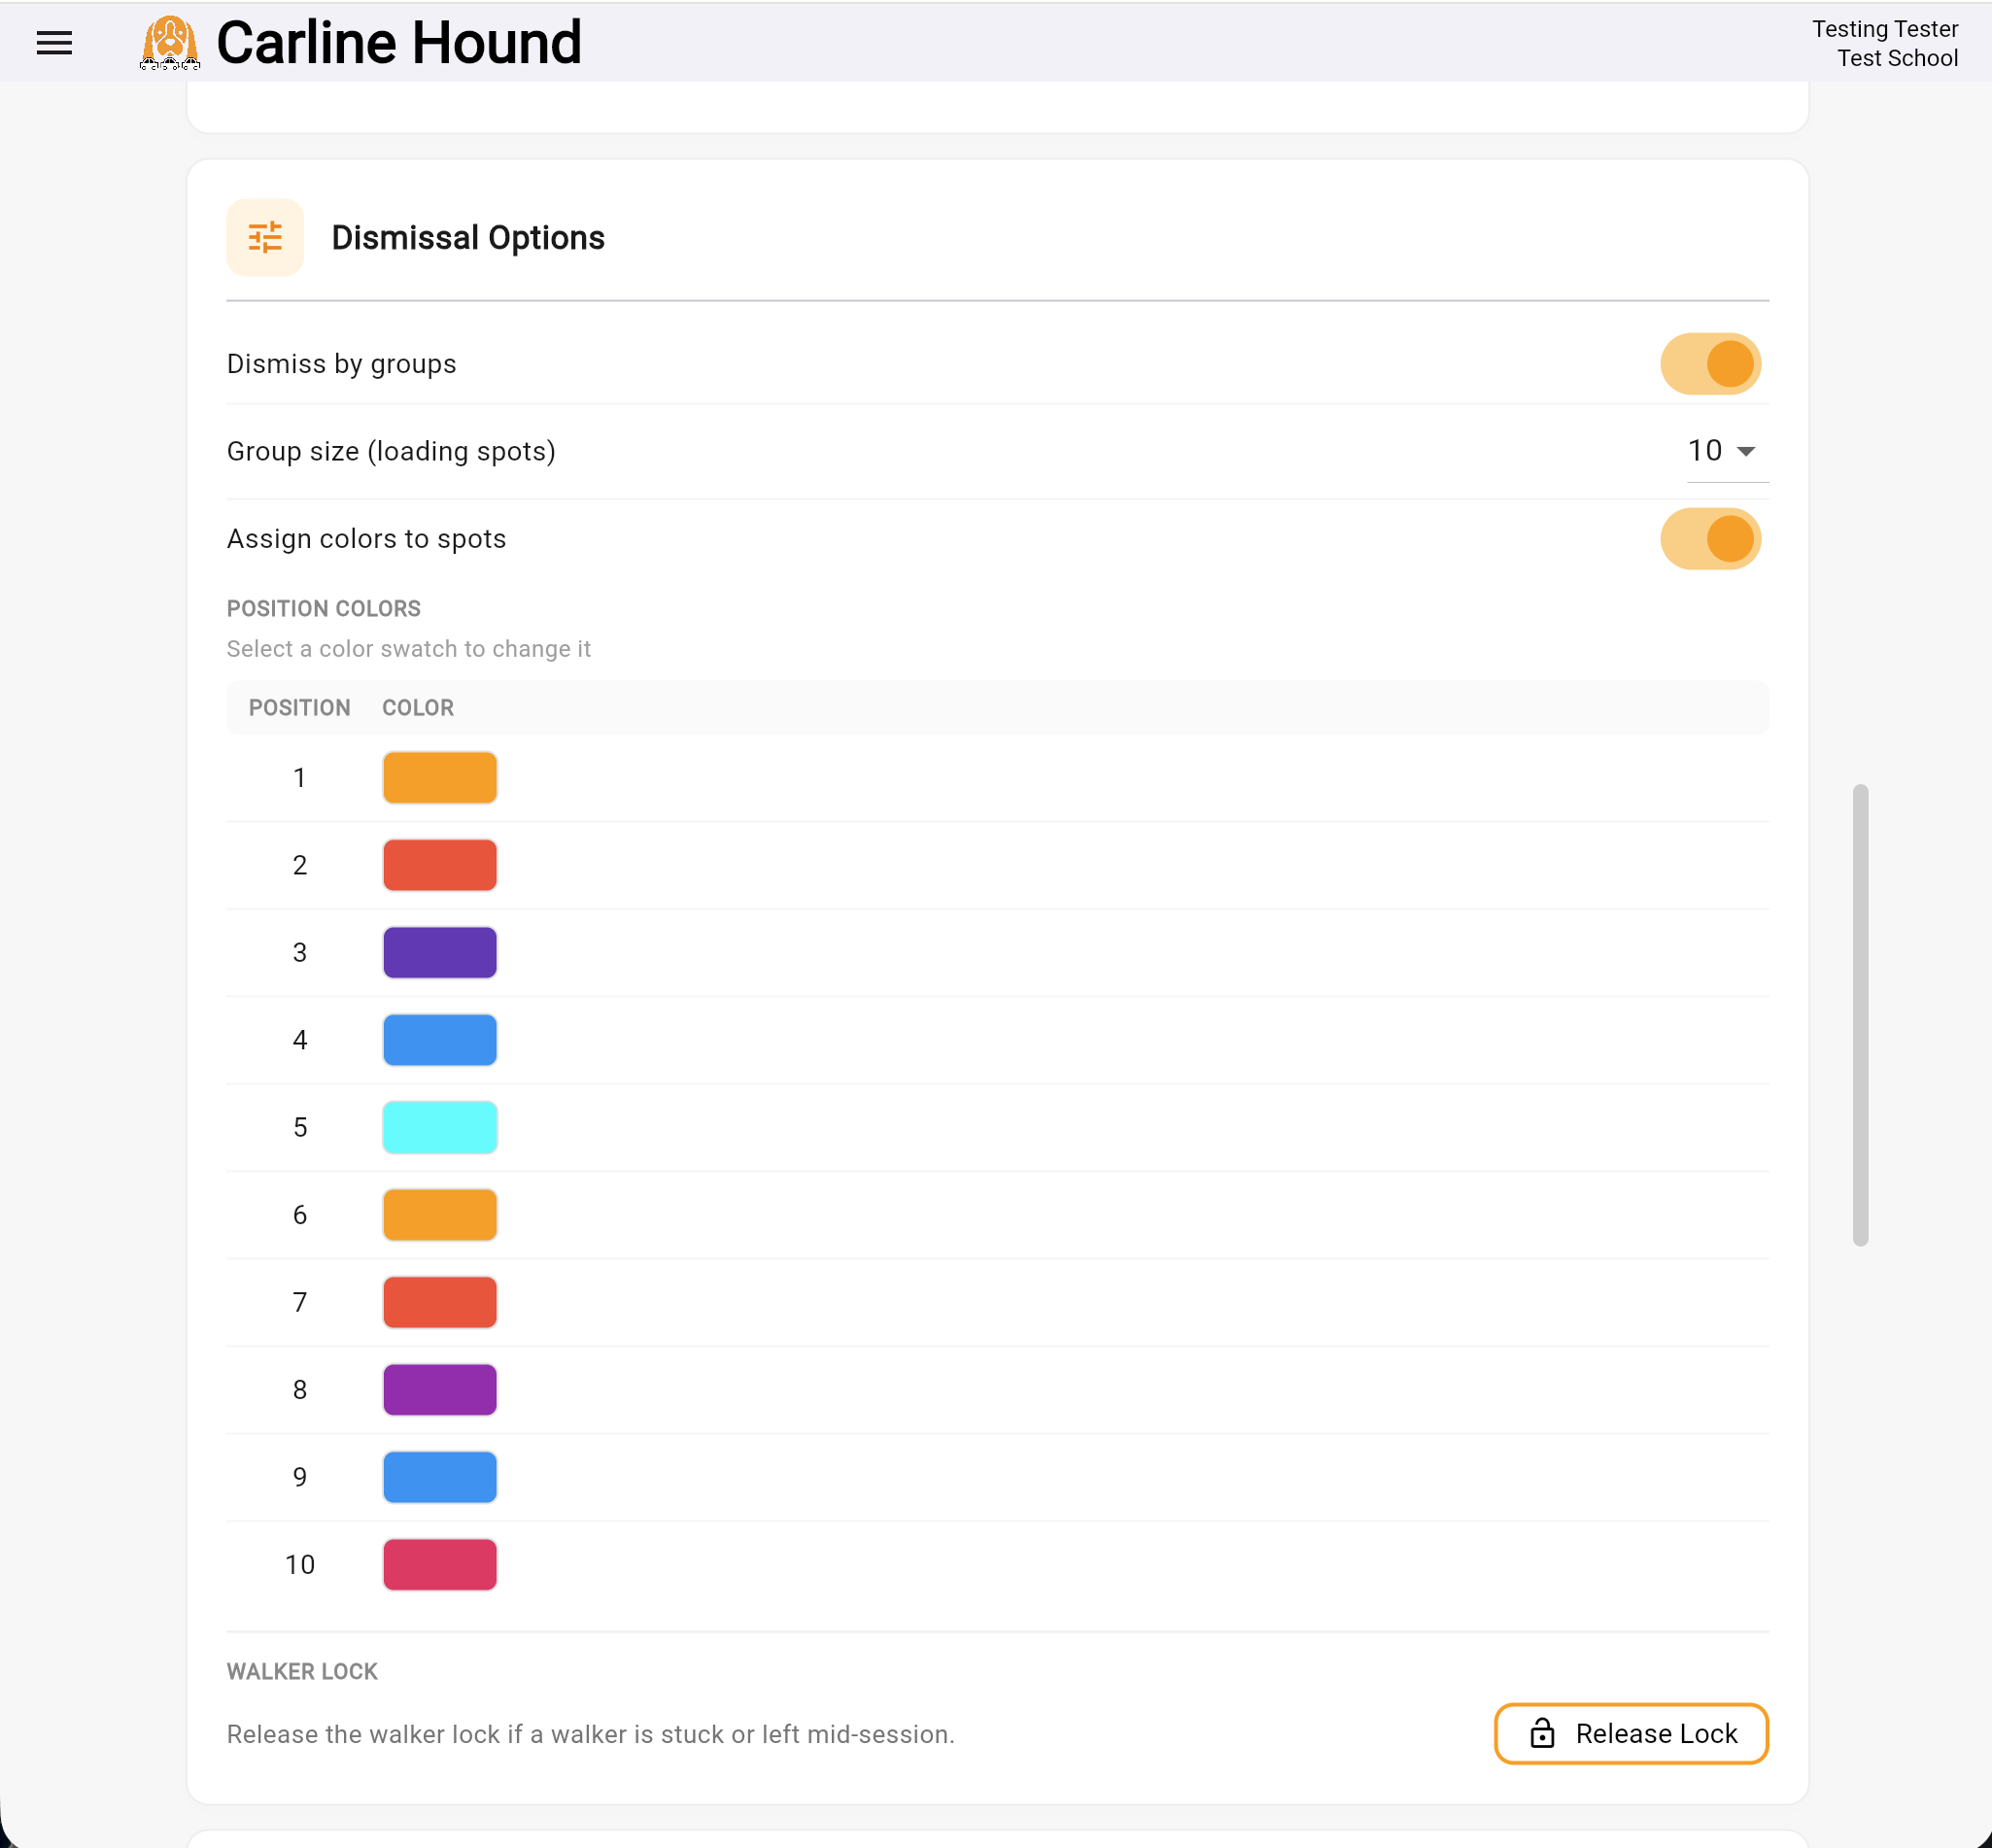
Positions (group size)
Positions is the number of pickup spots in your car line where children can enter cars at the same time. If your school can load 8 cars simultaneously, set positions to 8. The on-screen label is Group size (loading spots).
The Line Marshal and Large Display views use this number to decide how many families to show as ready for pickup at any moment. You set positions when you first create your school, but you can change it any time. Changes take effect immediately — useful if you're tuning your dismissal flow during the first week of school.
Dismiss by groups
The Dismiss by groups toggle decides how the Marshal's queue is organized:
- On (default) — families are batched into groups of N (where N is your positions setting). The Marshal sees one group at a time on the NOW list, taps Dismiss to release the entire group, and the next group advances. This matches a typical "load N cars at a time" carline.
- Off — there are no groups. The whole queue appears in one continuous list, and the Marshal swipes individual names off the list to dismiss each family as they reach the pickup point. Use this mode when your line doesn't load in fixed batches — a single drive-through pickup point, for example, or any rhythm that's naturally one-at-a-time.
The Walker's job doesn't change either way — they still tap rider numbers as cars arrive. Switch modes any time from Settings → Dismissal Options.
Approving users
When new staff or helpers request to join your school, their requests appear in the User List in Settings. As an admin, you'll see each pending user's name and can:
- Approve them as a regular user — they can log in and use the Line Walker, Line Marshal, Large Display, or Classroom views, but cannot access Settings.
- Approve them as an admin — they can do everything a regular user can, plus access Settings to manage the rider list, approve other users, change positions, and manage subscriptions.
Most teachers and helpers should be regular users. Reserve admin access for the people who actually run setup — usually one or two office staff plus the principal.
Rule of thumb: anyone who'll touch Settings is an admin. Everyone else is a regular user.
You can change someone's admin status later from the same User List screen, and you can remove users who've left the school.
Creating sub-schools (optional)
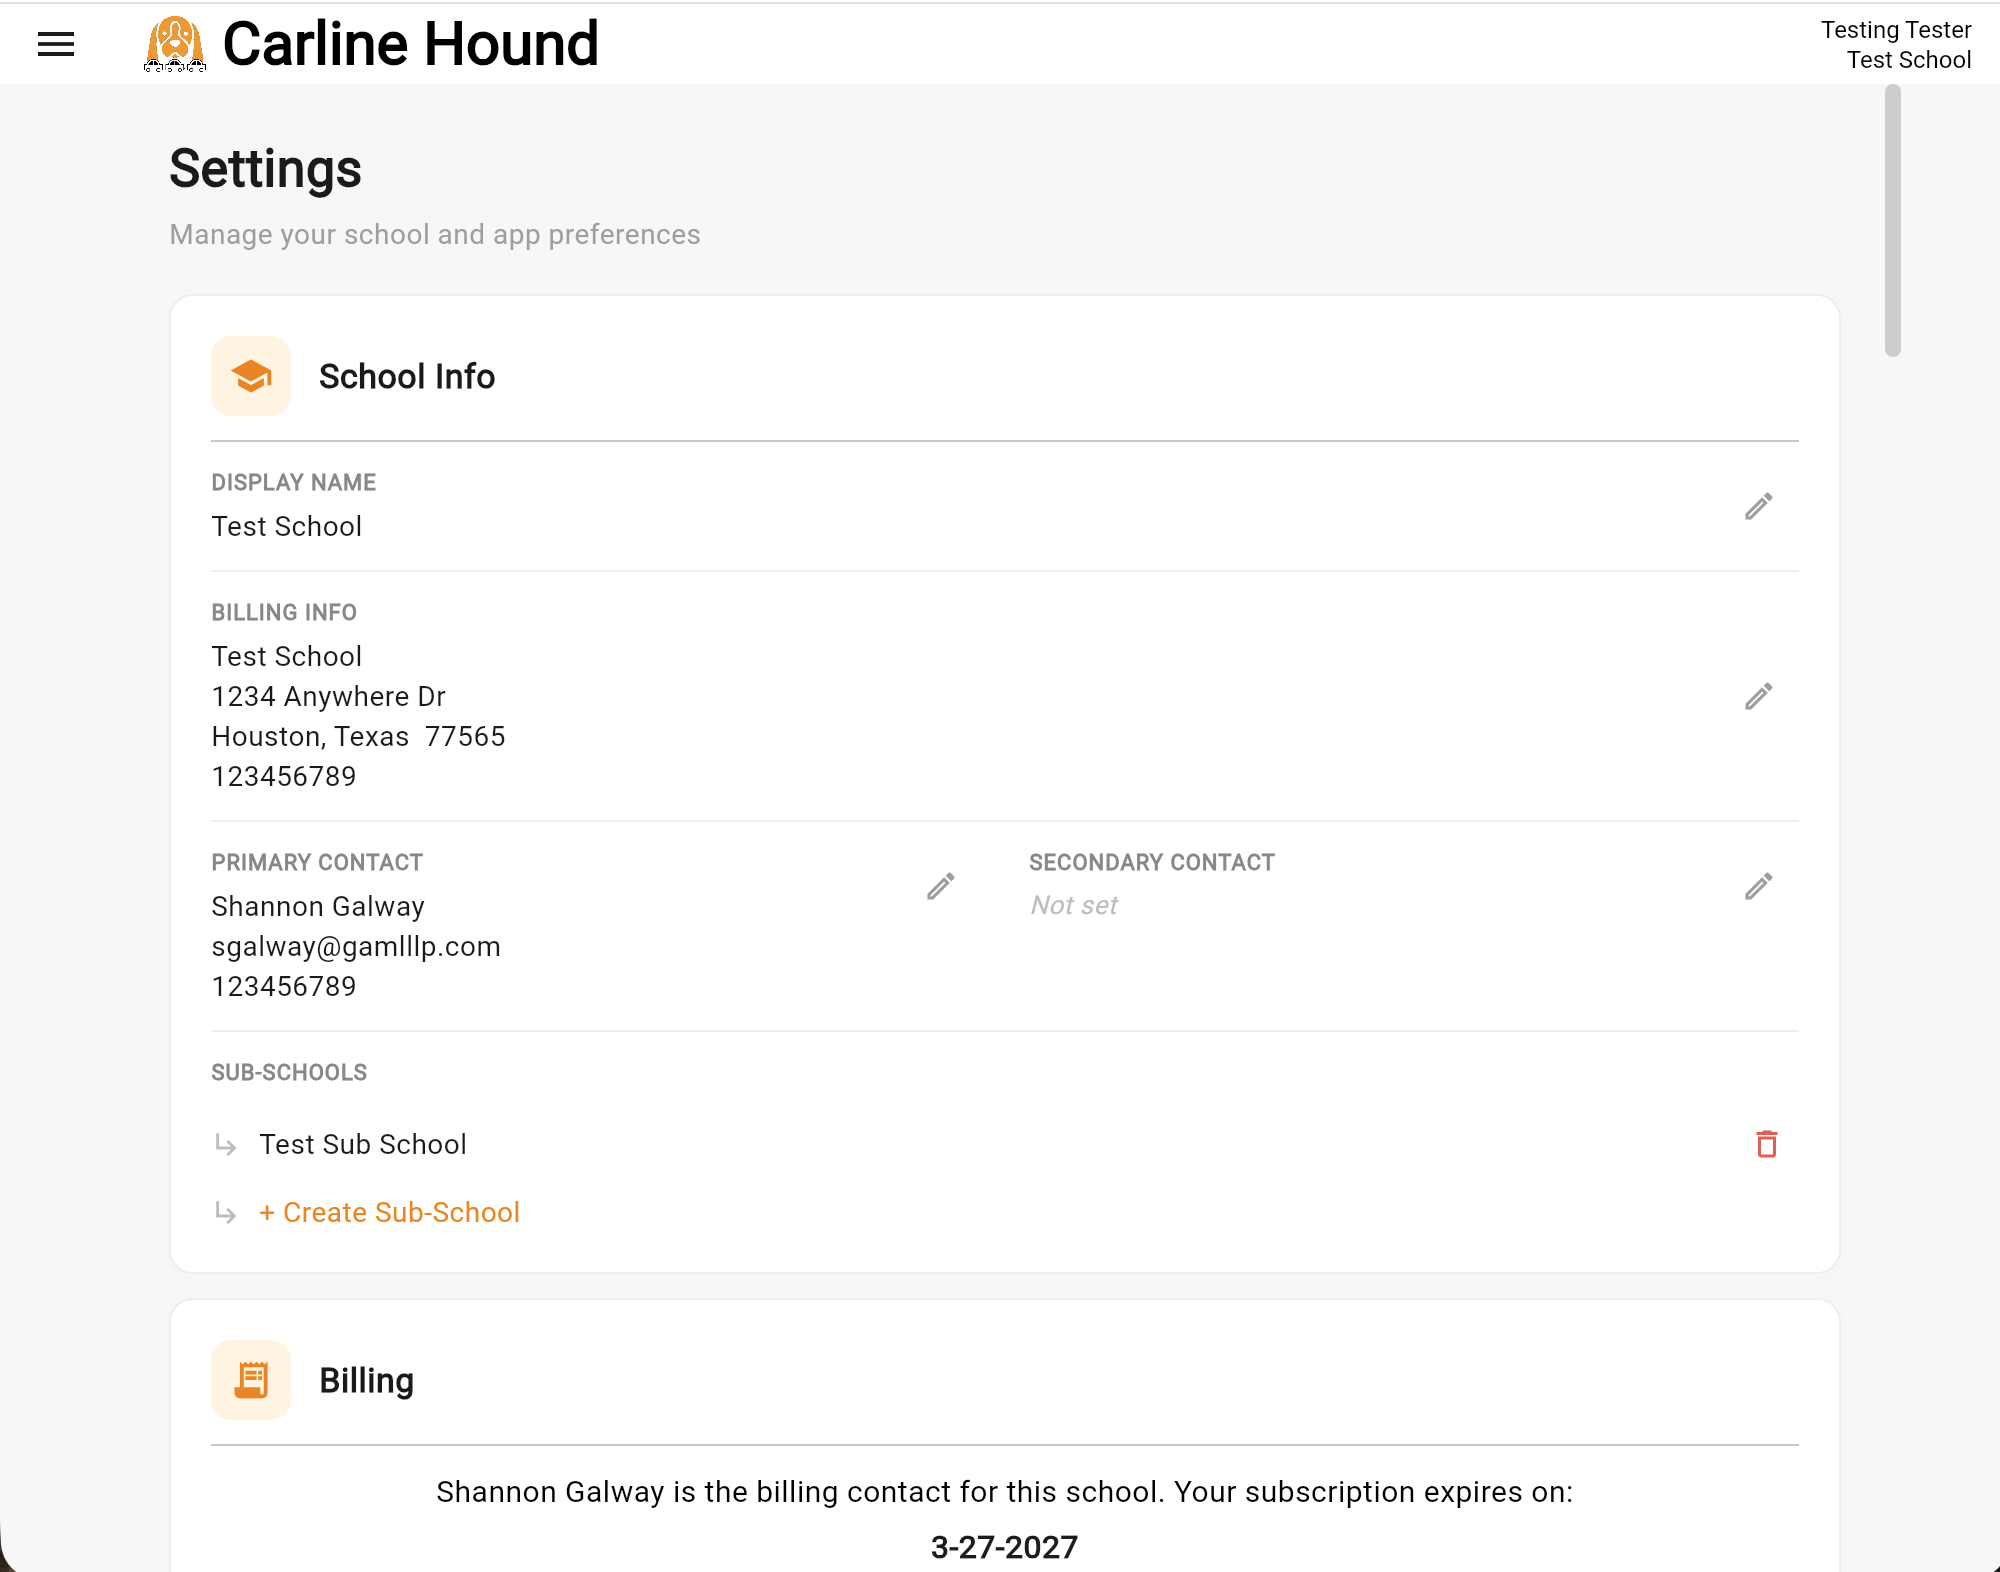
If your school operates dismissal from more than one location — for example, separate K–2 and 3–5 dismissal points, or a main and an annex campus — you can create a sub-school so each location runs its own independent dismissal under one subscription.
Sub-schools are created from the School Info area of the Settings page (shown at the start of this section). When you create one:
- The new sub-school starts with an empty rider list. You'll upload a separate
.xlsxfile for it, listing only the families dismissed from that location. - All current users of the parent school are automatically copied into the new sub-school, with the same admin status they have at the parent. After creation, the two user lists are independent — adding or removing a user at the parent school no longer affects the sub-school, and vice versa.
- Each sub-school has its own positions setting, its own Line Walker, and its own Line Marshal.
Once sub-schools exist, every user — including admins — chooses which one to follow from the My Profile option in the hamburger menu. A user can only monitor one sub-school at a time. To switch, they reopen My Profile and select a different one.
What happens next
With your rider list uploaded, positions set, and your team approved, you're ready to run your first dismissal. The next section walks through how each role uses the app during dismissal — Line Walker, Line Marshal, Large Display, and Classroom.
5. Daily Dismissal Workflow
This section walks through how each role uses the app during dismissal: the Line Walker entering numbers, the Line Marshal dismissing families, the Large Display in the waiting area, and teachers dismissing students from the Classroom view.
How the four roles work together
When a car pulls up, the Line Walker enters that family's rider number. The number — and the family's name — appears immediately on the Line Marshal's screen, on the Large Display in the cafeteria or gym, and on the Classroom view for the teachers whose students are in that family. The Line Marshal then dismisses the families currently in their NOW list to their cars, and all the displays advance. The whole loop is fast: each entry typically appears across the screens within a second or two.
Line Walker
The Line Walker walks the carline as cars arrive and enters each family's rider number on a keypad. Every submitted entry adds that family to the dismissal queue.
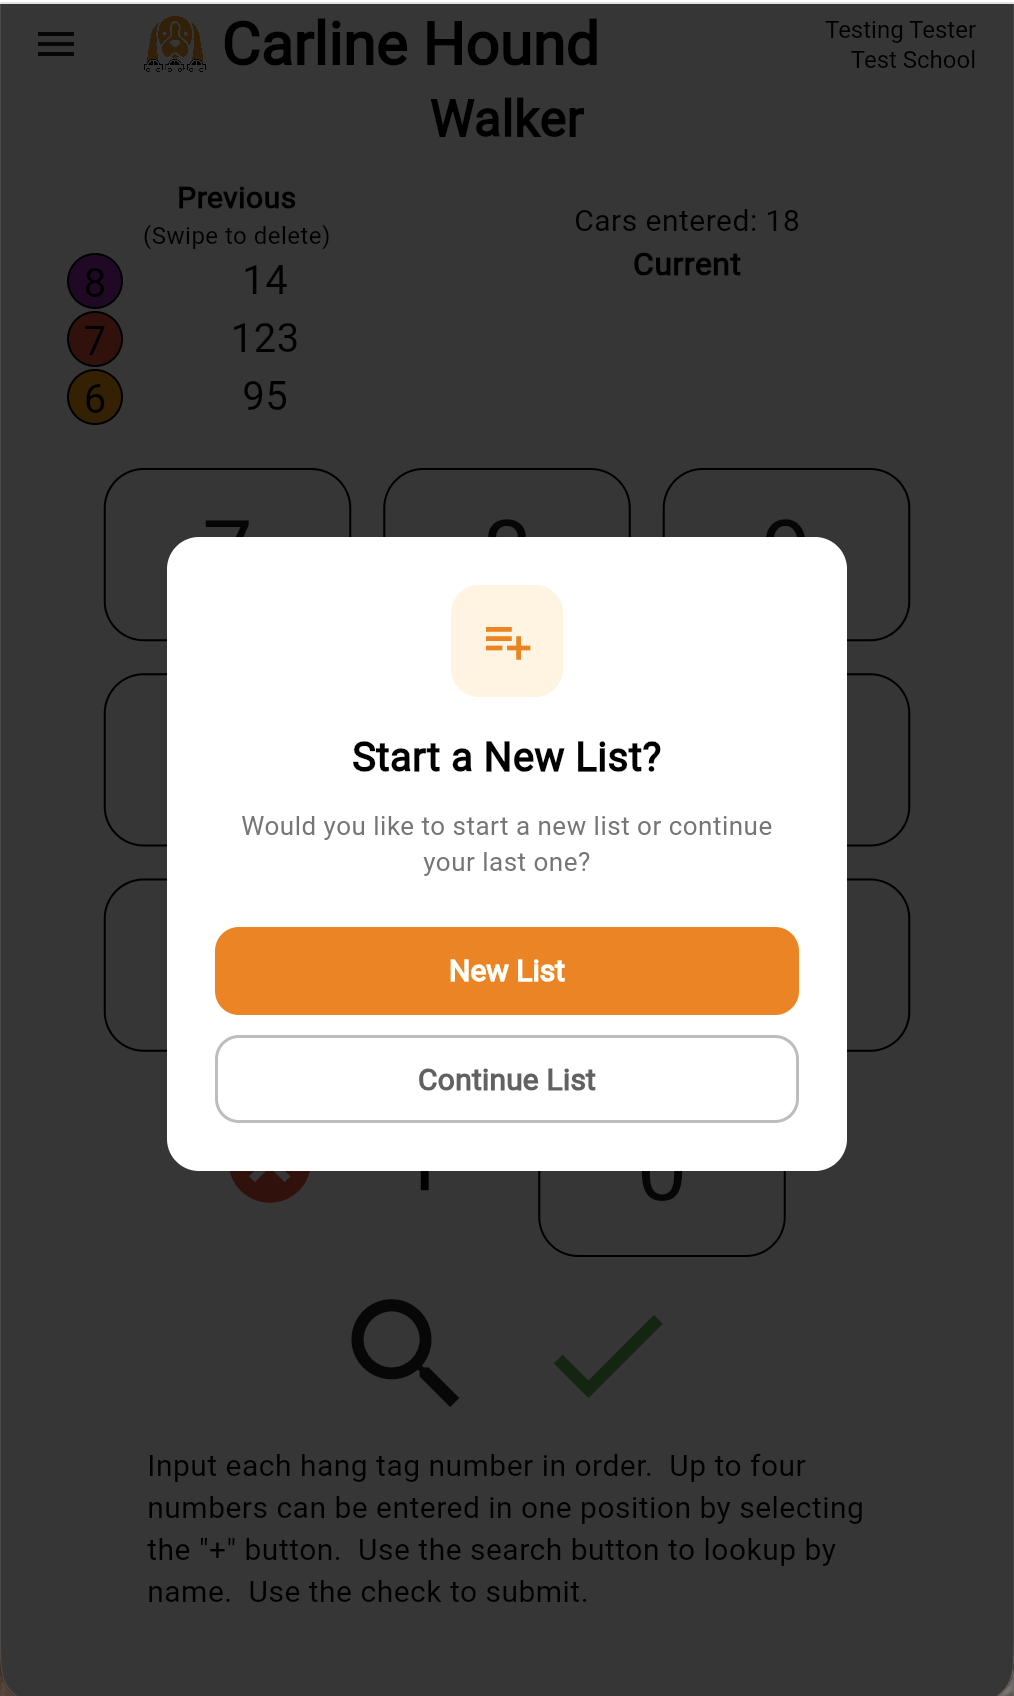
Starting a list
When you tap into the Walker role, the app may ask whether to Start a New List or Continue your last one. Pick New List for a fresh dismissal session — start of the day, new shift, or after the previous one ended. Pick Continue List if you stepped away briefly and want to resume the queue you were already building.
One Walker at a time
Carline Hound allows only one active Walker at a time per school (or per sub-school). If you try to enter the Walker screen while someone else is already there, you'll see the Walker Locked dialog.
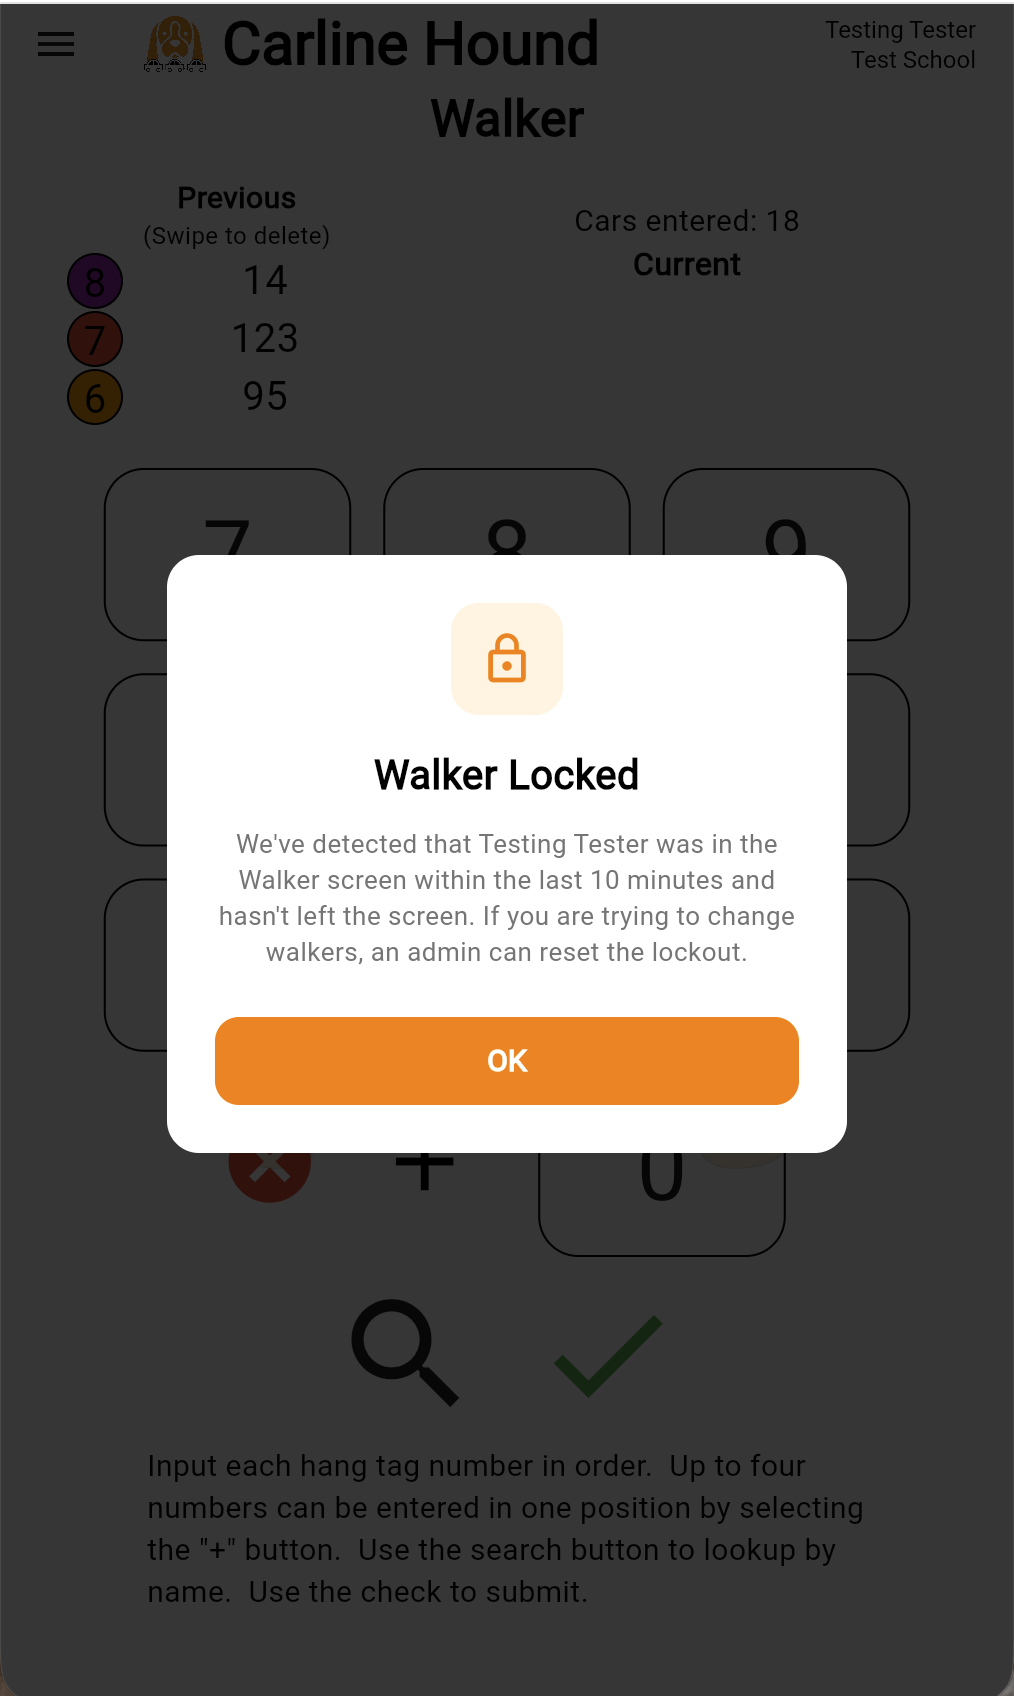
The lock auto-releases after the previous Walker has been inactive in the Walker screen for 10 minutes. If you need to take over sooner, an admin can clear it from Settings → Dismissal Options → Walker Lock → Release Walker Lock.
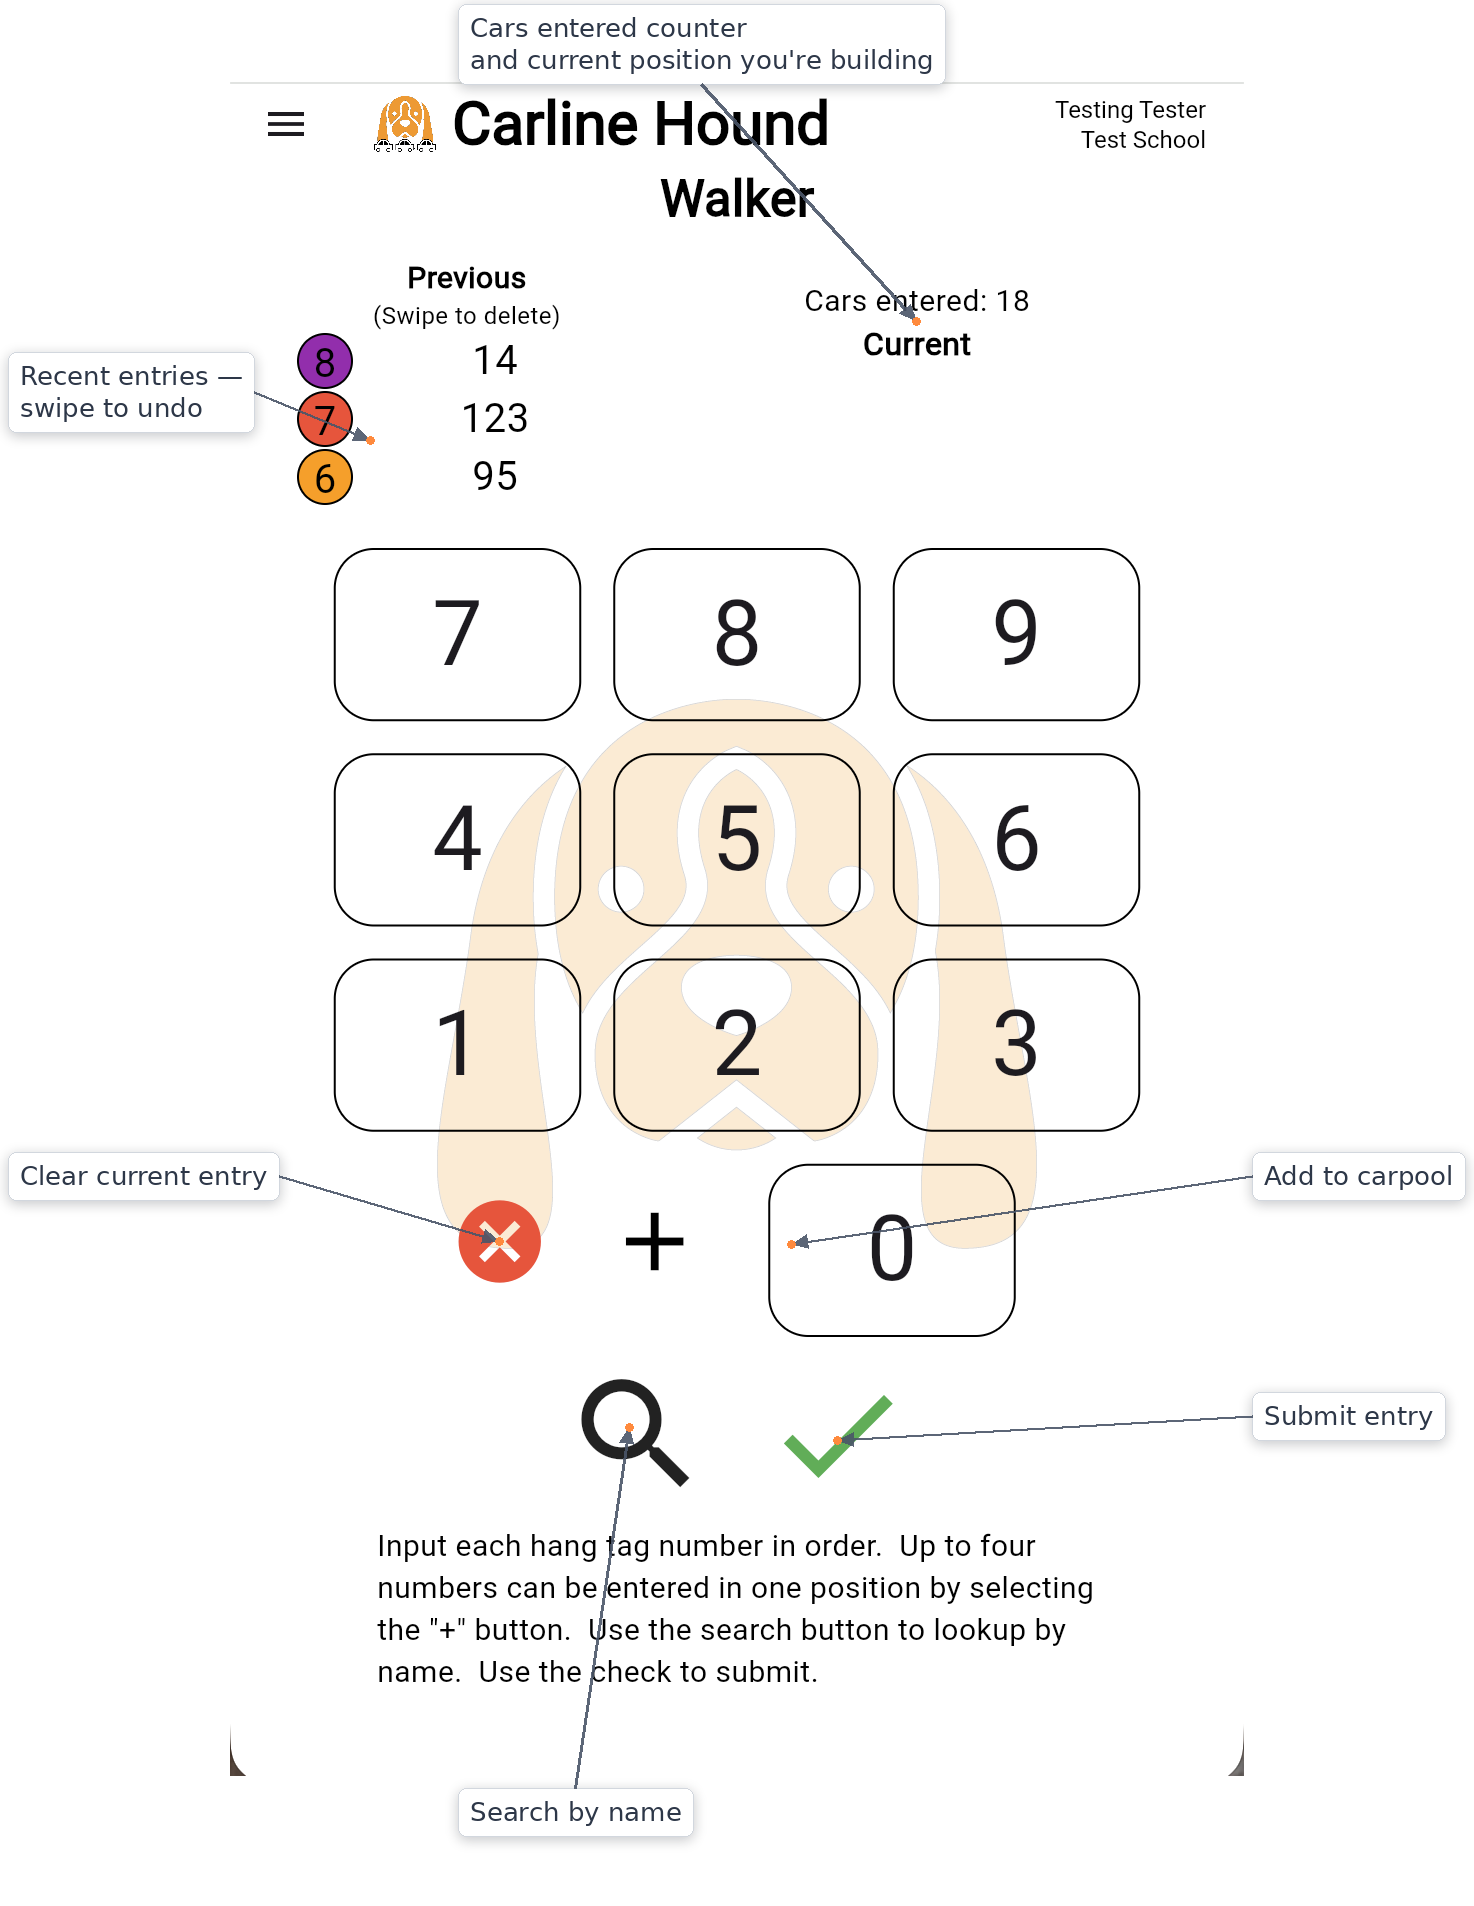
Entering numbers
The keypad shows digits 0–9, plus a delete button (red ✗), a multi-entry button (+), and a submit button (green ✓). Type a rider number, then tap the green ✓ to submit it. The family appears immediately on the Marshal, Large Display, and matching Classroom views.
The screen also shows:
- Cars entered — running count of submissions for this list.
- Previous (Swipe to delete) — your last few entries, with the position number on the left and the rider number you typed on the right. If you mistyped a number, swipe its row off to remove it from the queue.
Multiple numbers in one position
When two or more families pull up to the same physical position simultaneously — siblings in different cars, carpools, neighbors arriving together — tap + to add another number to the same position before tapping ✓. Up to four numbers can share a single position.
Search by name
If a hang tag is missing, faded, or unfamiliar, tap the magnifier (search) icon to look the family up by name instead of by number.
Line Marshal
The Line Marshal manages the dismissal queue from a tablet or phone, releasing groups of families to their cars as the line advances.
Two modes. The Marshal screen behaves differently depending on whether Dismiss by groups is on (Settings → Dismissal Options). The description below covers the default group-based mode. For the continuous-list alternative, see Continuous-list mode further down this section.
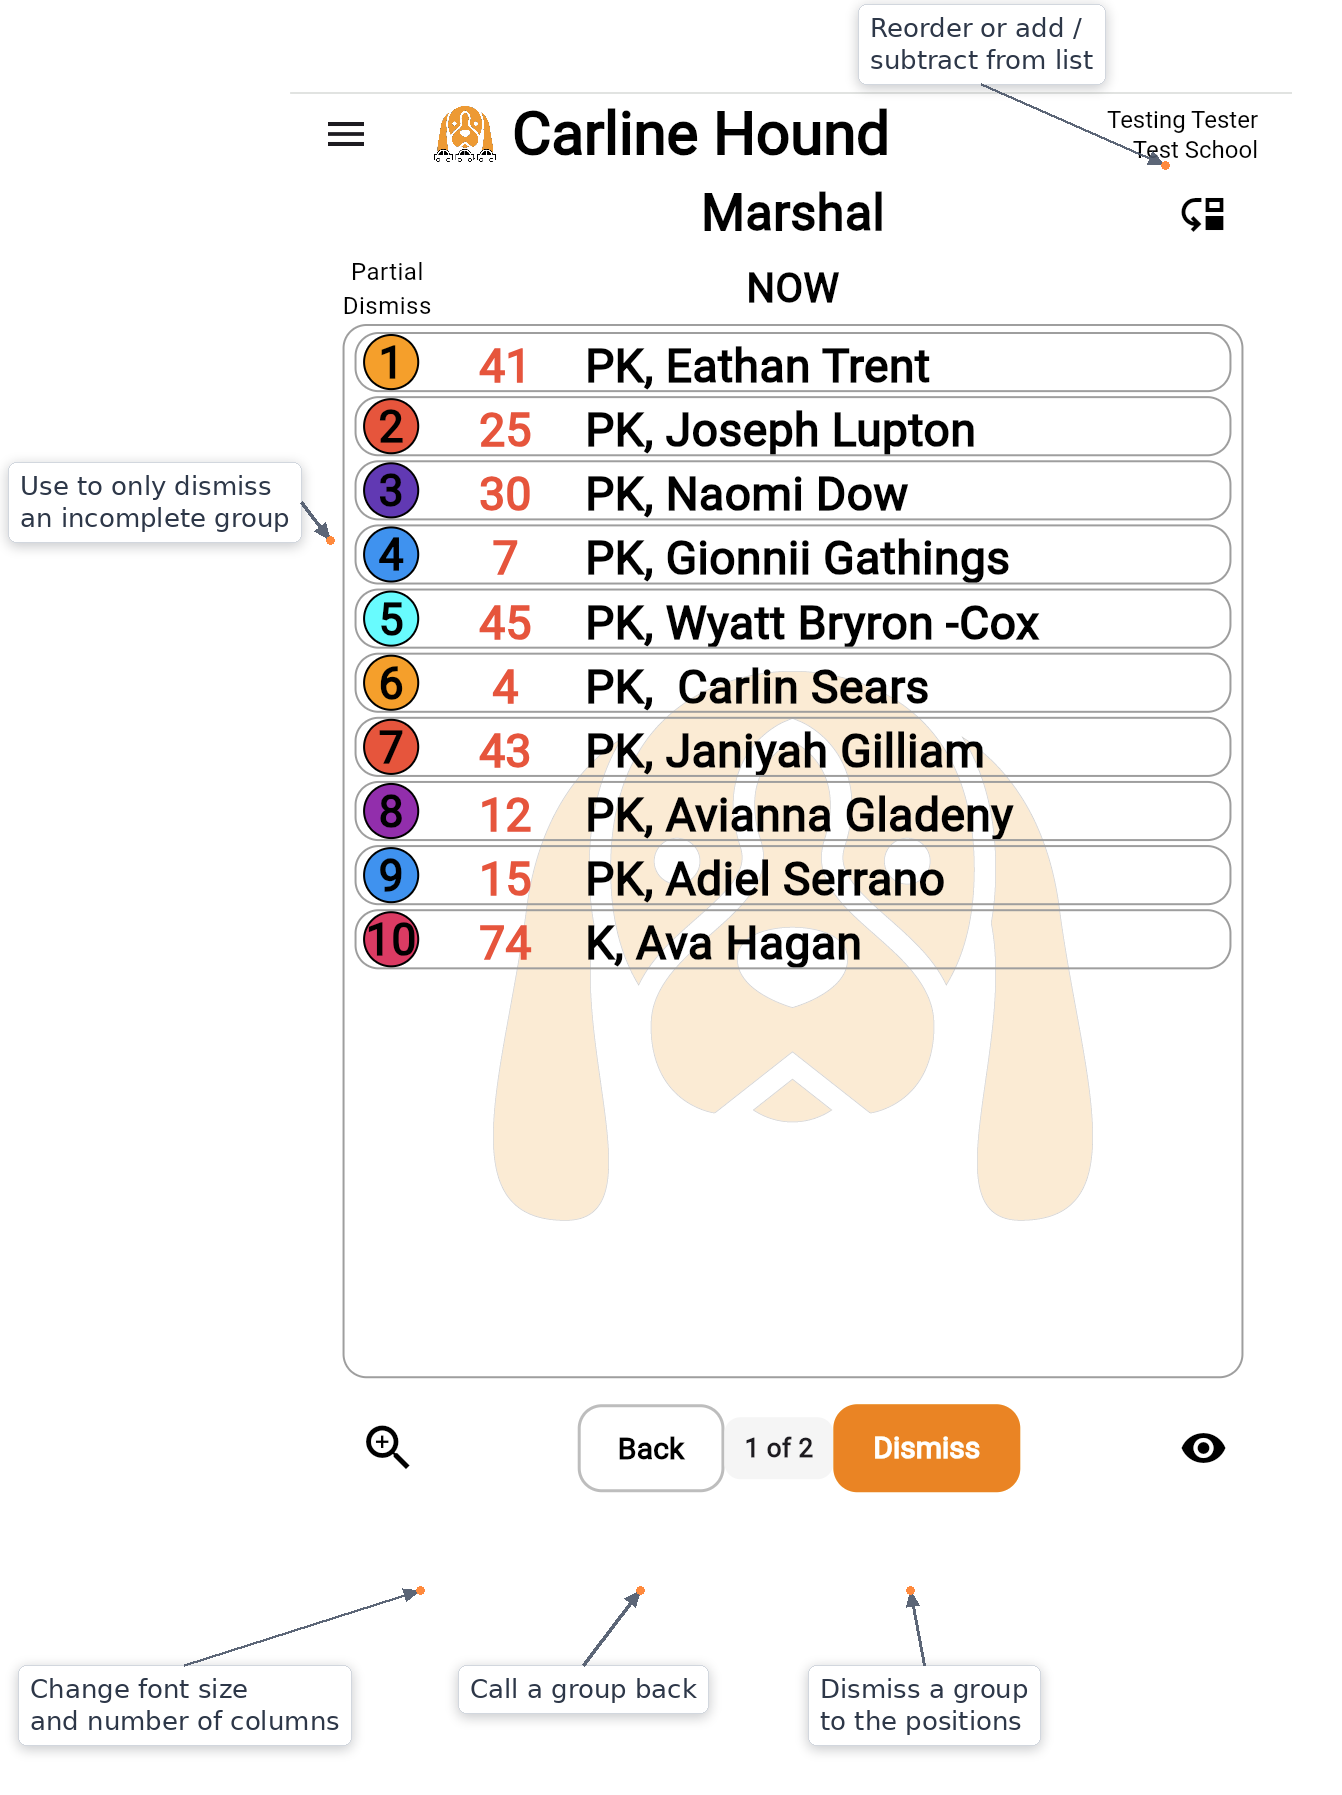
The NOW list (group mode)
The main view shows the current group of families ready for pickup — one row per family, with a colored numbered circle (the position), the rider number, and the name. The size of each group matches your school's positions setting (Settings → Dismissal Options).
The page indicator (e.g., 1 of 2) tells you how many groups are currently queued. Dismiss releases the current group to the positions; Back calls a group back — useful if a student needs to return to the line after they were already released.
Dismissing a group
Tap the orange Dismiss button to release the entire current group to their cars. The next group's families slide up into the NOW list, and the displays advance accordingly.
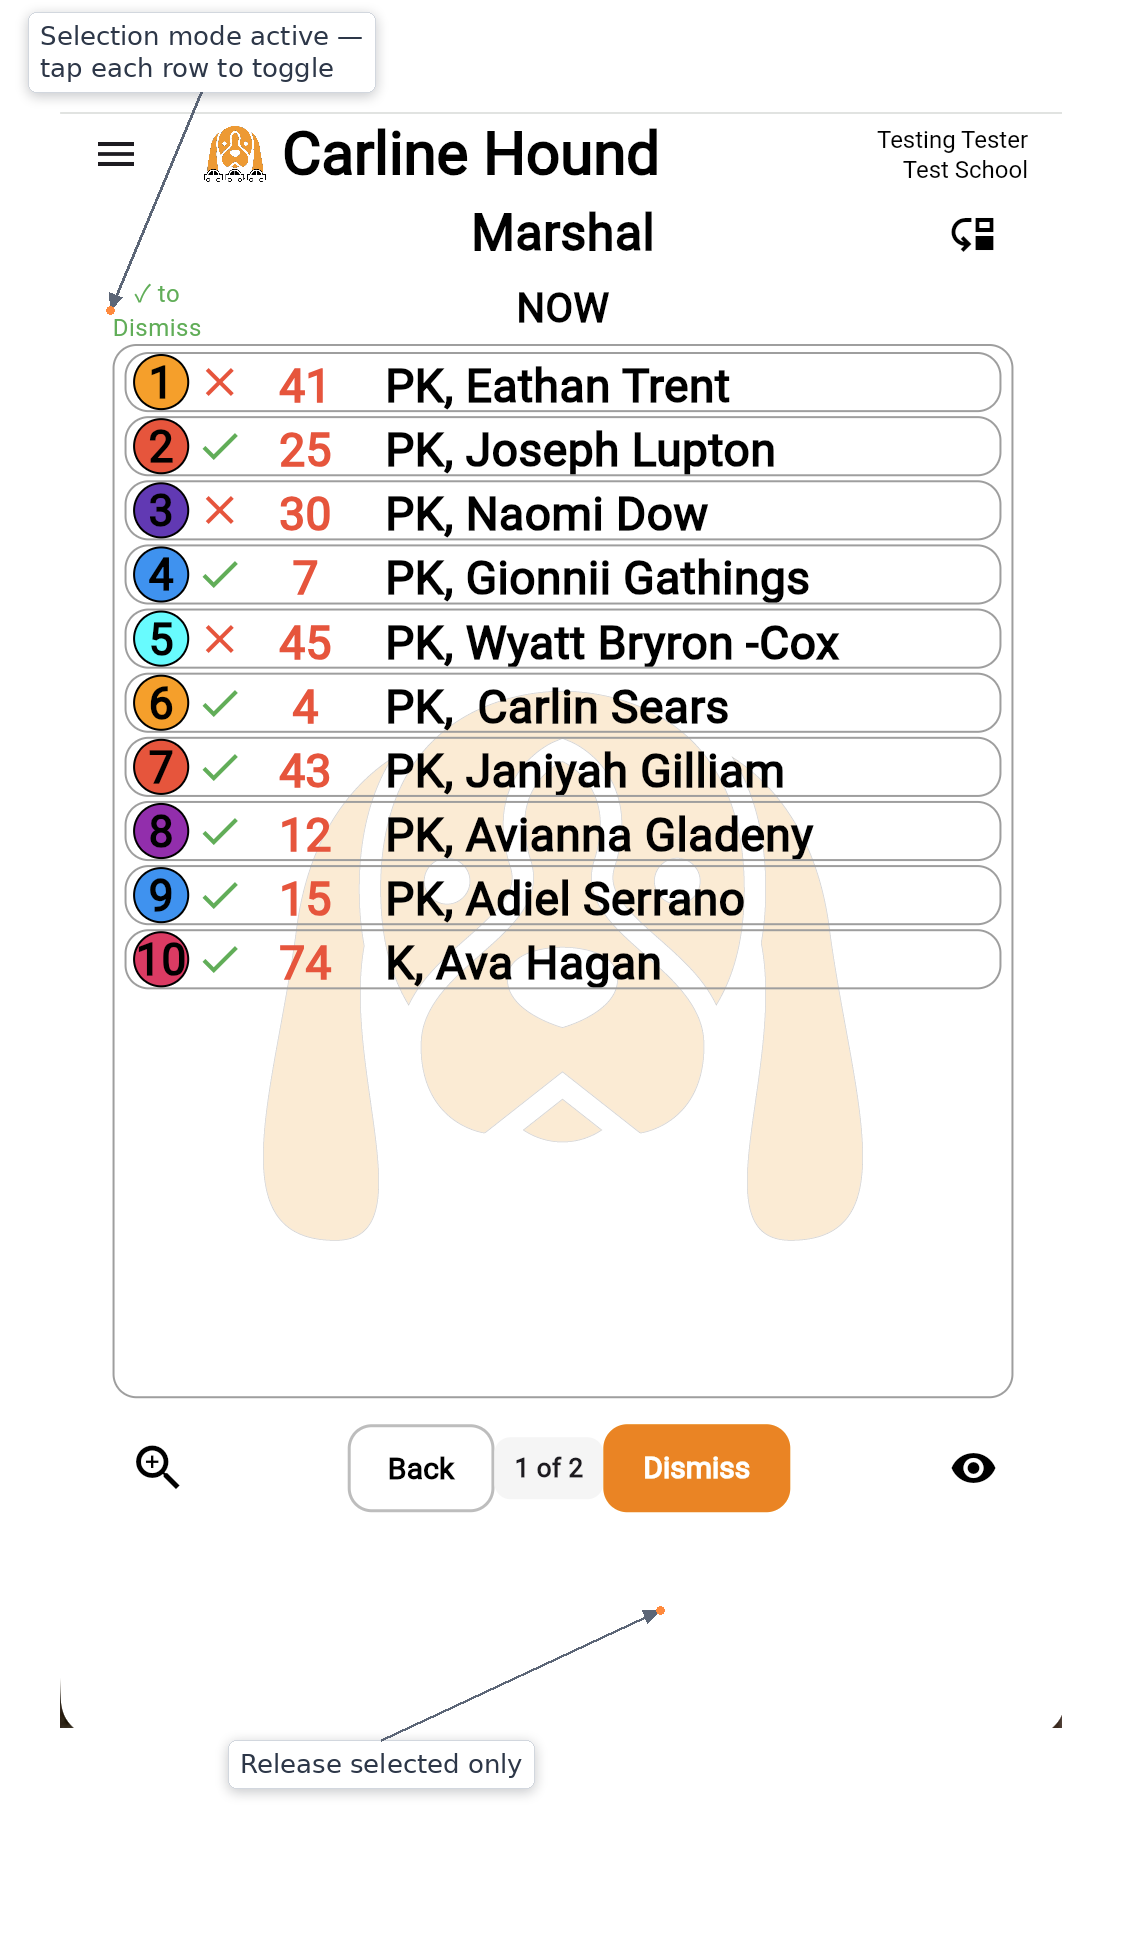
Partial dismiss
If only some families in the current group are ready — a sibling is missing, a student needs another minute — tap Partial Dismiss (the label rotated along the left edge of the screen) to enter selection mode. Each row gets a green check (dismiss) and a red ✗ (don't dismiss yet). Mark which families you want to release this round, then tap Dismiss. The families you didn't pick stay in the NOW list for the next round.
Peek at what's next
Tap the eye icon on the right side of the toolbar to peek at the ON DECK and READY groups without leaving the current NOW list. A side panel slides in showing the next two groups. Tap the eye again to close it.

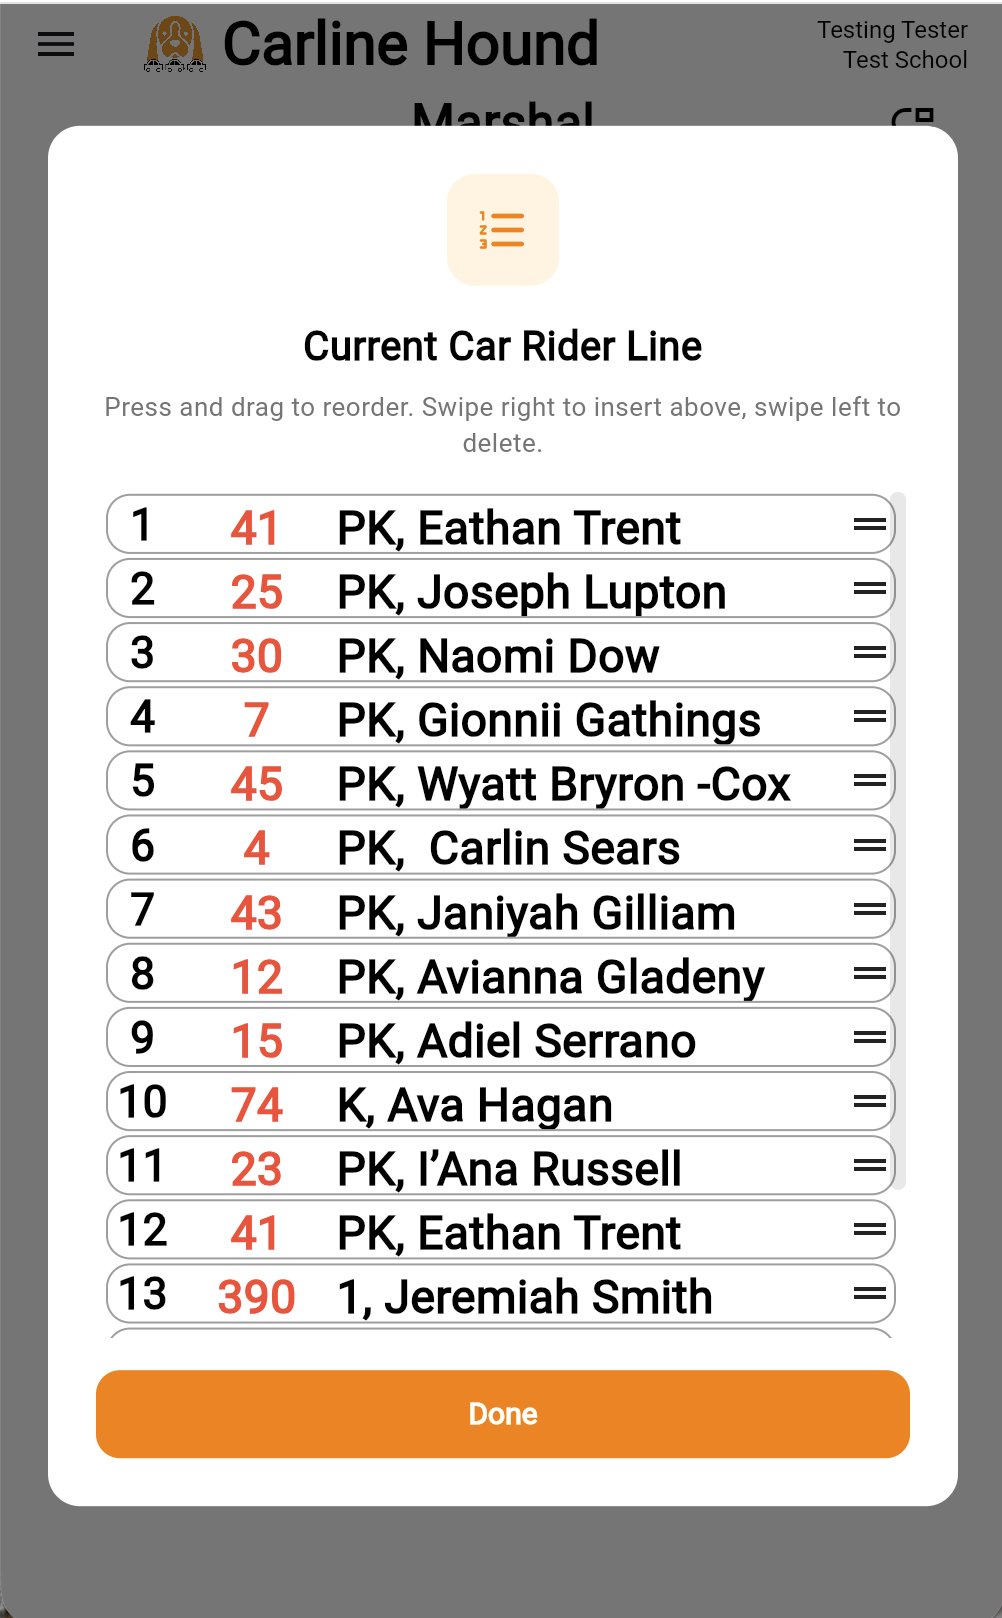
Reorder or remove entries
If the Walker entered something out of order, or you need to remove an entry the Walker added by mistake, tap the reorder icon in the top-right of the Marshal screen. The Current Car Rider Line editor opens. Press and drag a row to move it; swipe right to insert it above (promote a family ahead in line); swipe left to delete the row. Tap Done when finished.
Adjust the view
You can tune how the Marshal list displays for the room and device you're using. Tap the magnifier icon in the bottom toolbar to open the adjust panel, then drag the text size slider for larger or smaller text, and choose between 1, 2, or 3 columns to fit more or fewer dismiss groups on screen at once.

Continuous-list mode
If Dismiss by groups is turned off (Settings → Dismissal Options), the Marshal screen shows the entire dismissal queue as one continuous list instead of paginated groups. To dismiss families:
- Swipe individual rows off the list to release each family as they reach the pickup point.
- Group-oriented controls — page indicator, Back, Partial Dismiss — don't apply in this mode.
Adjust-the-view and reorder still work the same way. Continuous-list mode fits schools where families flow through a single pickup point one at a time rather than loading in batches.
Large Display
The Large Display is a read-only view designed for cafeterias, gyms, or any common area where students wait. It shows three columns side by side:
- NOW — families currently being released by the Marshal.
- ON DECK — the next group up.
- READY — the group after that.
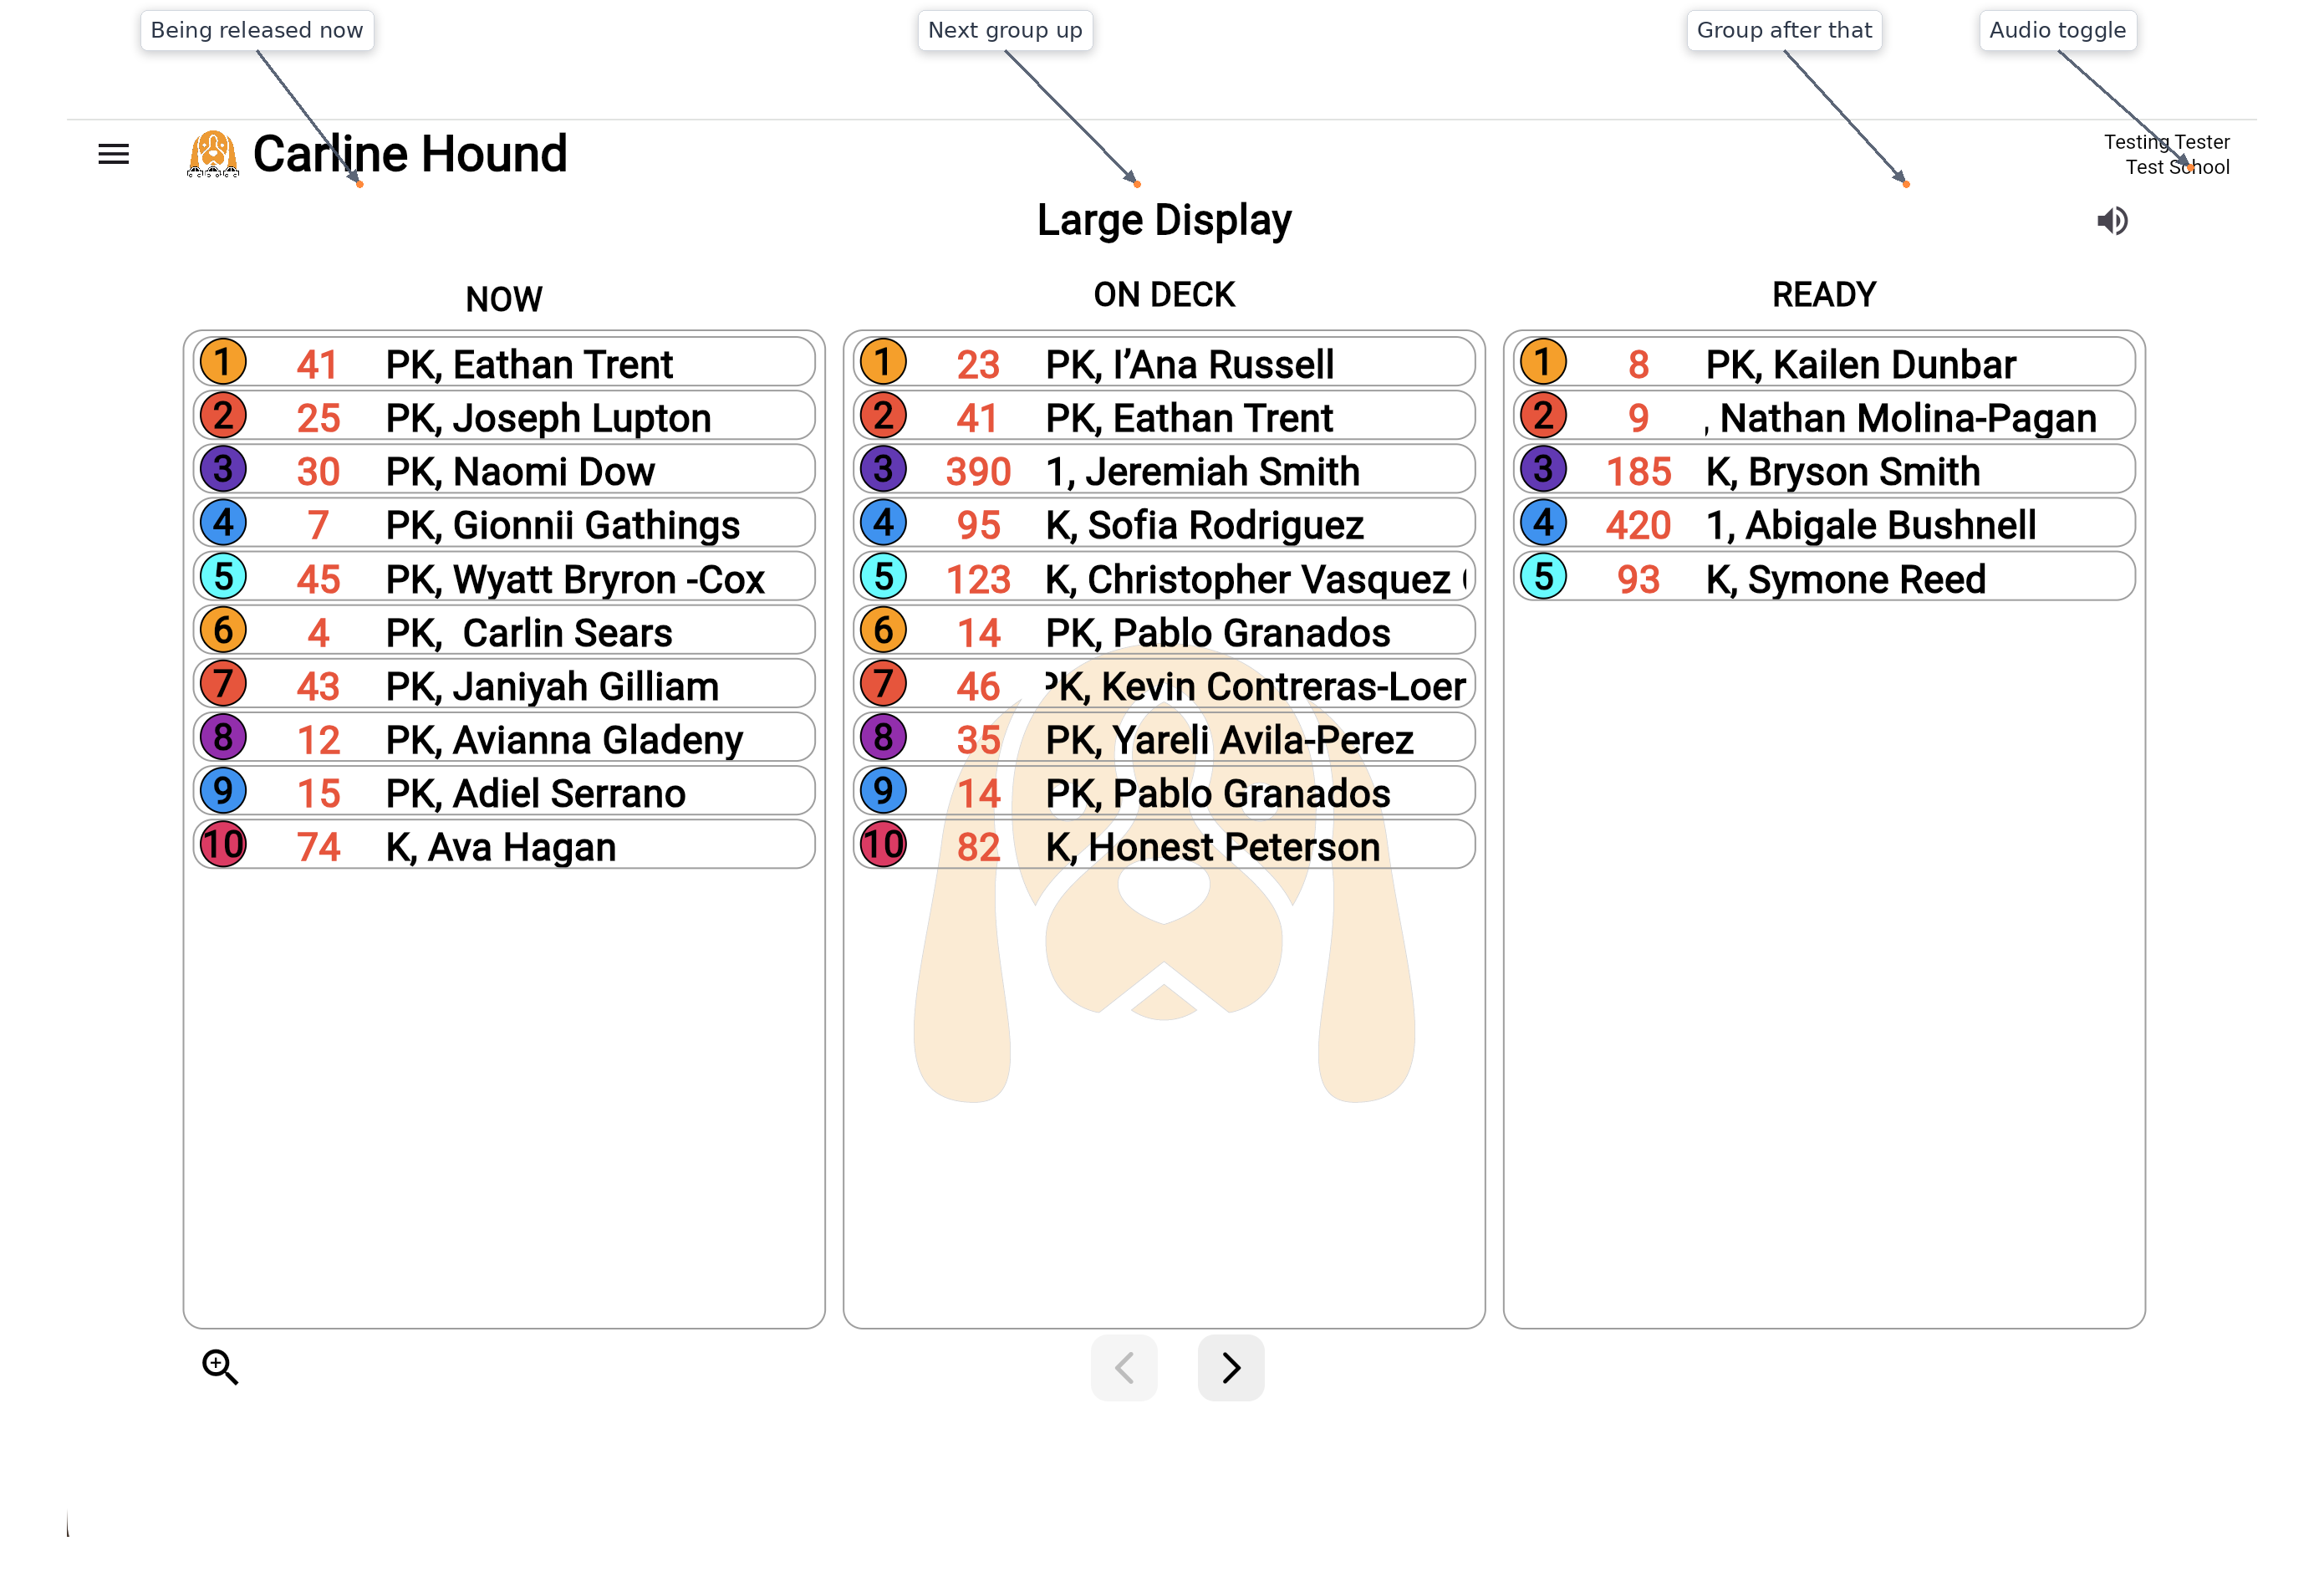
As the Marshal dismisses each group, the columns shift left automatically: ON DECK slides into NOW, READY slides into ON DECK, and the next group fills READY. There's no interaction needed during dismissal — open the Large Display on a smartboard, projector, smart TV, or computer at the start of dismissal and let it run.
The webview makes this easiest, since you can run it in any browser without installing anything. The speaker icon in the top-right toggles audio indicators.
Classroom
The Classroom view is for teachers who dismiss students directly from their rooms. Each teacher selects their own name from the dropdown, and the screen filters to show only their students from the current dismissal queue.
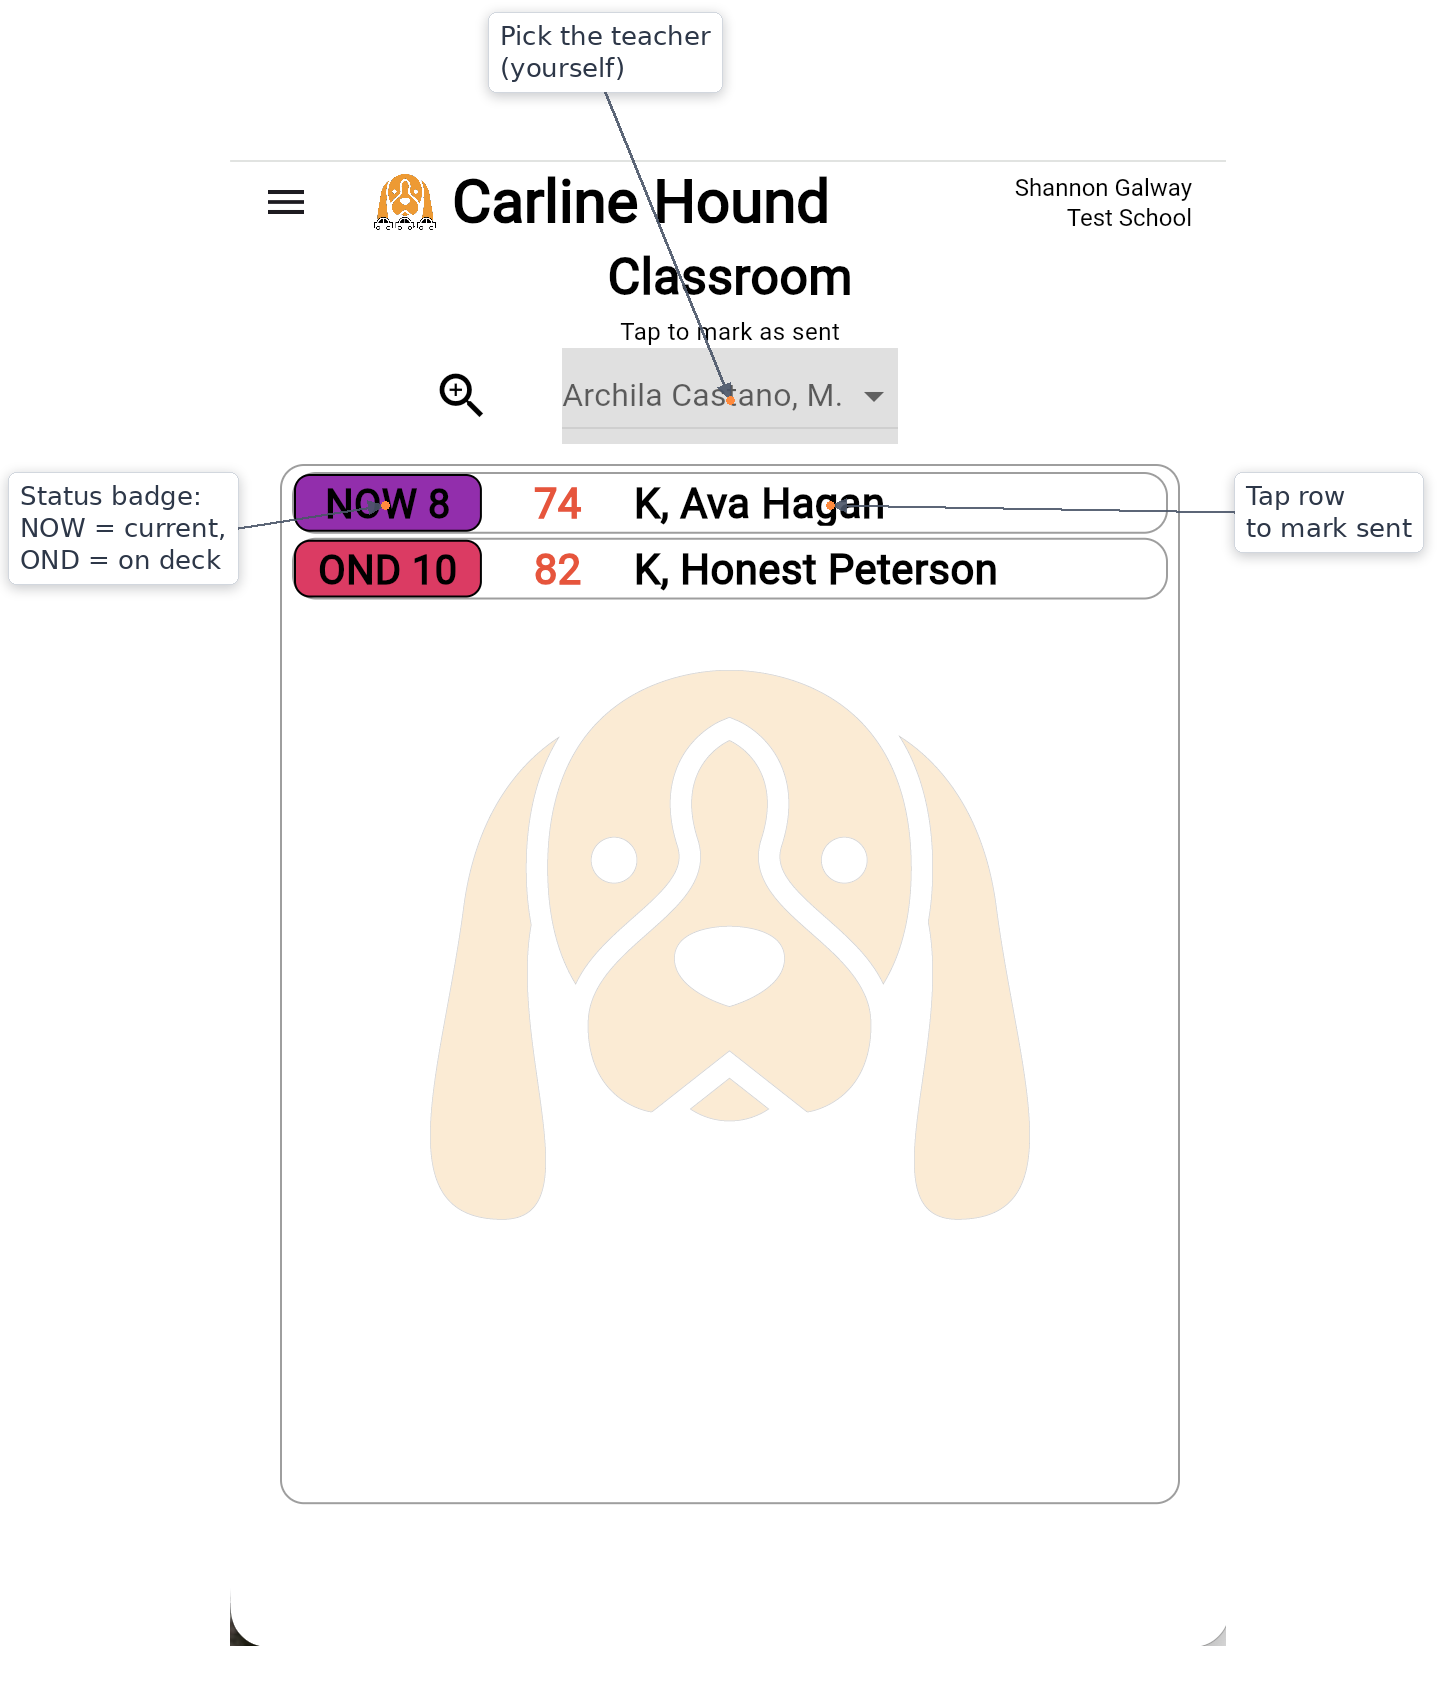
Each row shows the student's status — for example NOW 8 means the student's family is currently being called at position 8, and OND 10 (on deck) means they're queued for position 10 next. The rider number and student name follow.
Tap a student row to mark them as sent — your signal that you've handed the student off toward the pickup point. The row clears from your list once they're sent.
The Classroom view fits nicely on a phone or tablet kept on the teacher's desk during dismissal. It works on any device that runs Carline Hound: web, iOS, or Android.
What happens next
The day-to-day workflow you've just walked through is the heart of Carline Hound. The next two sections cover My Profile (your personal account, sub-school switching, and the local device log — for everyone) and Settings & Admin (billing, QR codes, reports, the school-wide log, and other admin-only tasks).
6. My Profile
Tap My Profile from the hamburger menu to open your personal account dialog. This is available to every user, not just admins.
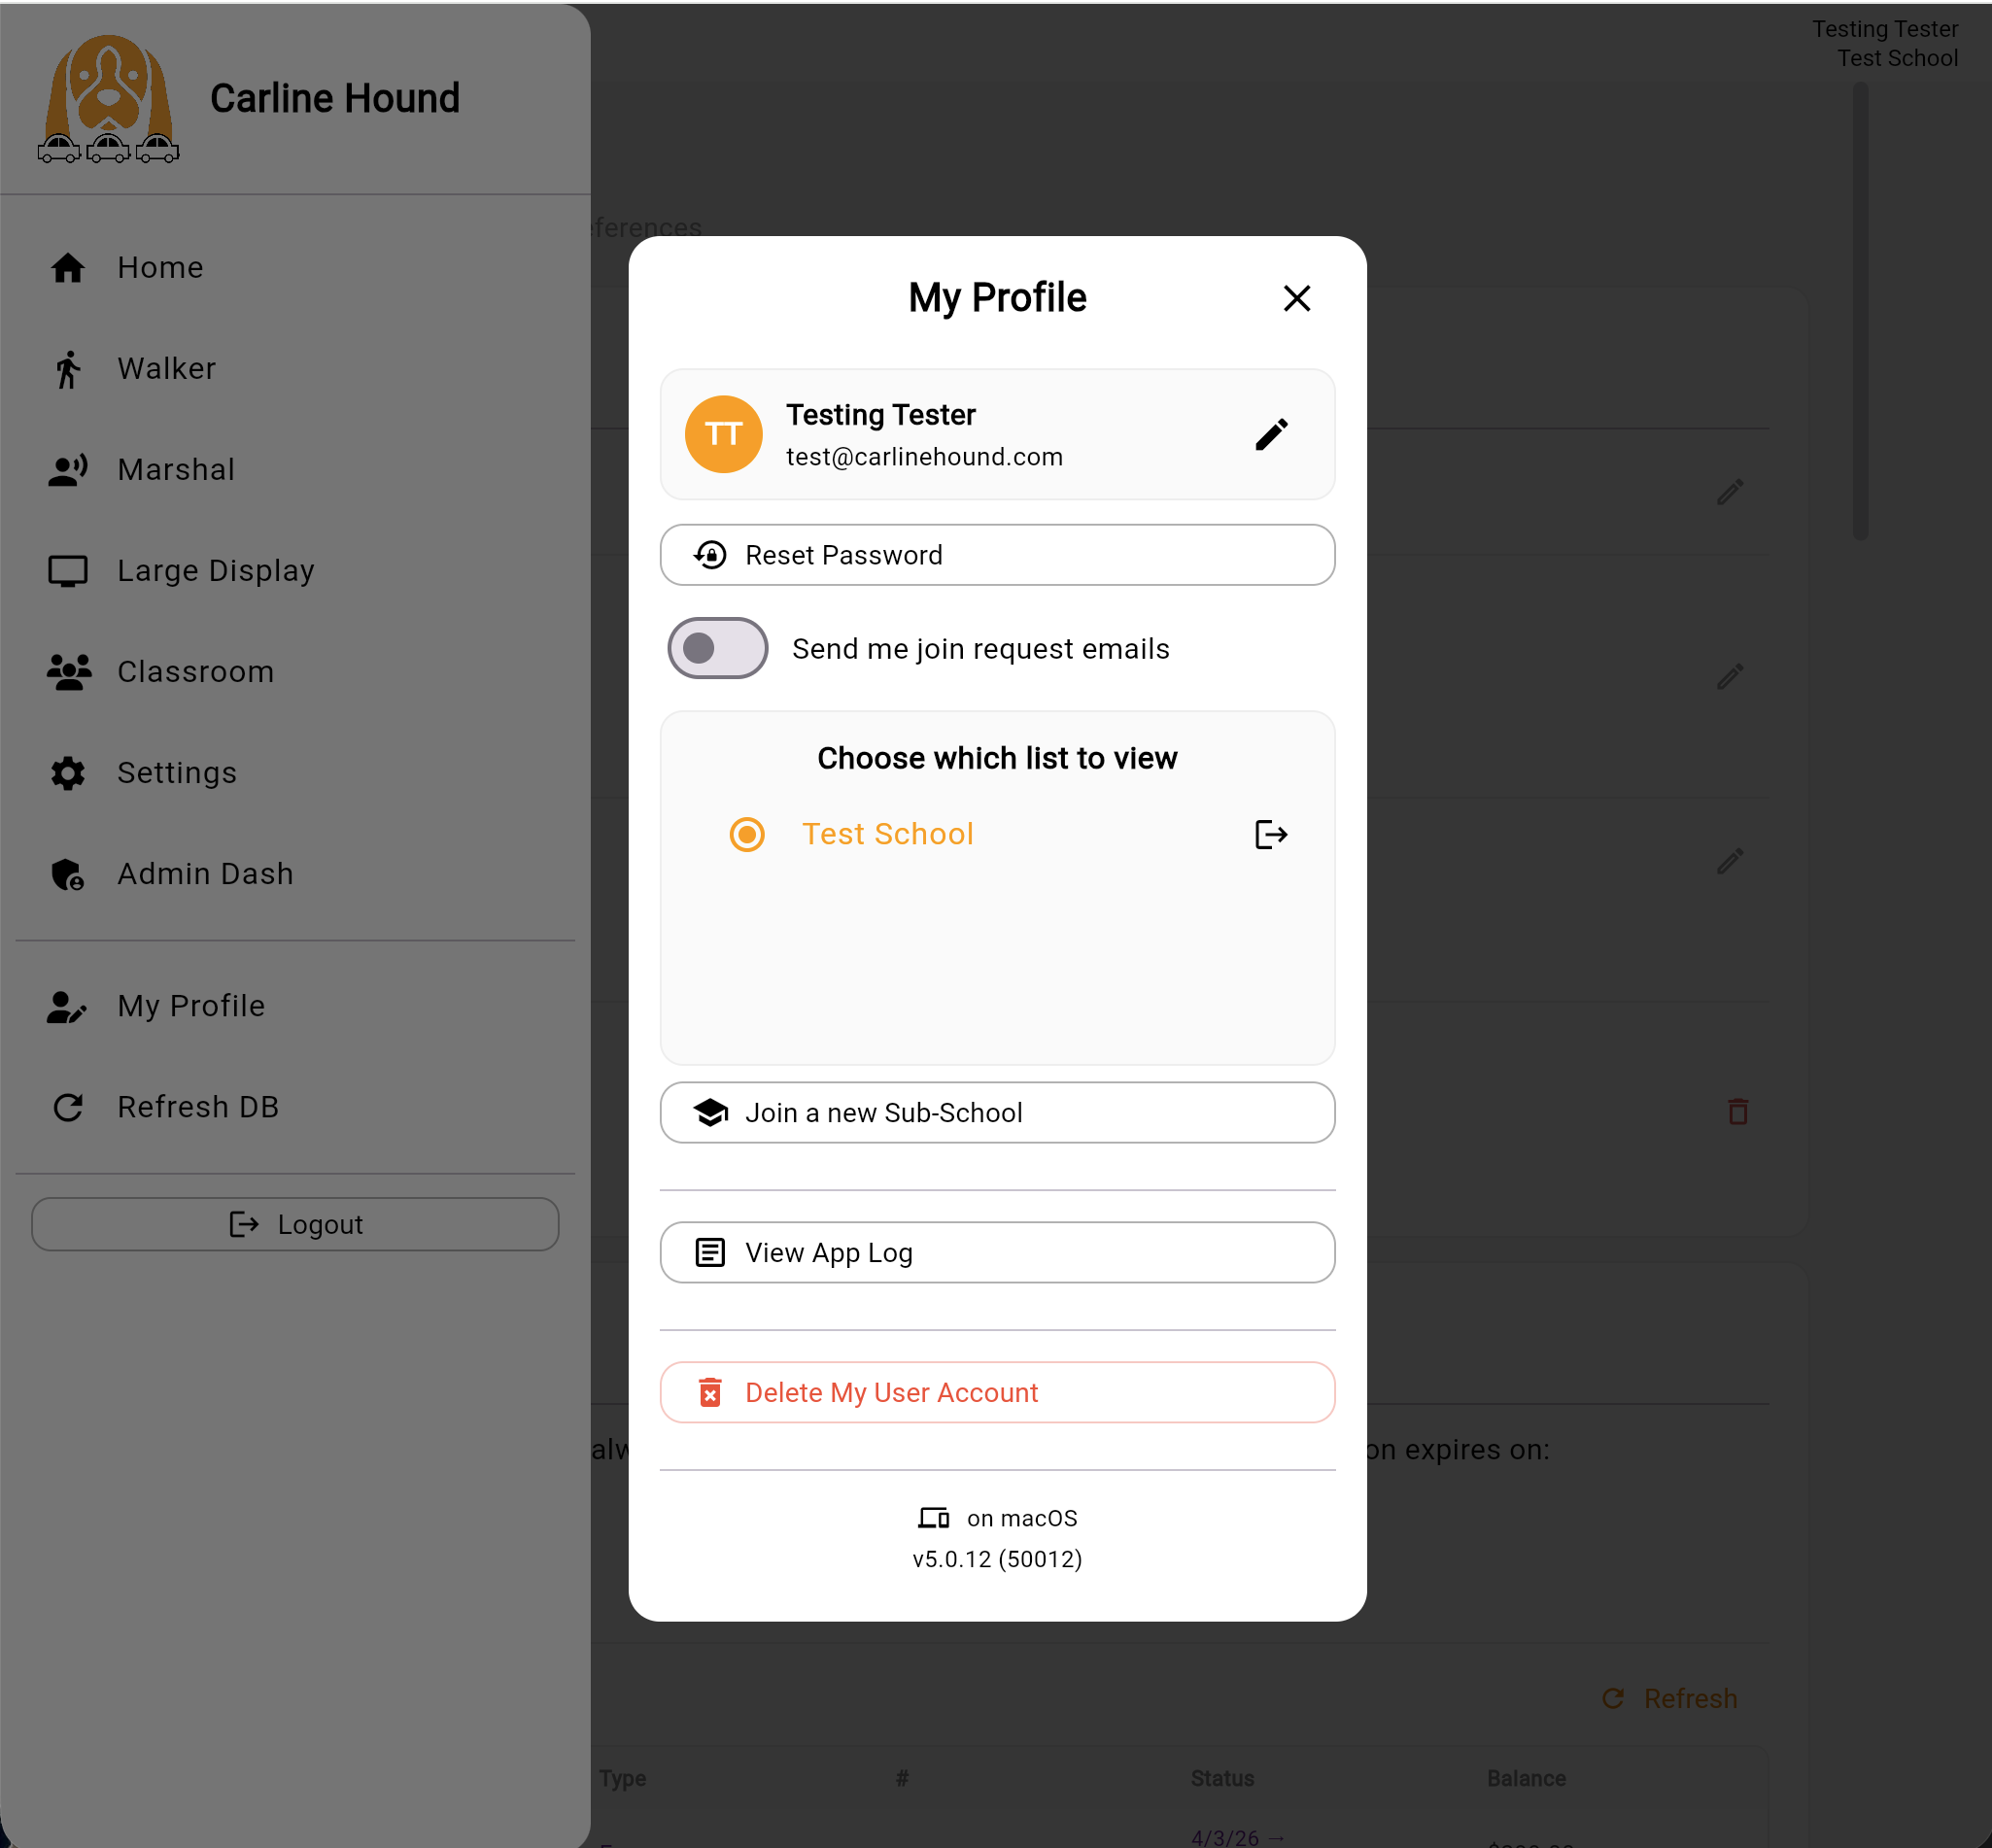
The dialog shows your avatar (initials), name, and email. From here you can:
- Edit your name (the pencil icon).
- Reset Password — sends you a password-reset email.
- Send me join request emails — toggle whether you receive an email when a new user requests to join your school. Useful for admins; can be turned off if you'd rather check the User List manually.
Switching sub-schools
Under Choose which list to view, the school (or sub-school) you're currently following is highlighted. Tap a different one to switch contexts — your Walker, Marshal, Large Display, and Classroom views will all reload with that sub-school's rider list and queue.
A user can only follow one sub-school at a time.
Joining a new sub-school
If your school has additional sub-schools and you've been added to one but not others, tap Join a new Sub-School to request access. The admin who manages that sub-school will see your request in their User List.
View App Log (this device)
Tap View App Log in your profile dialog to see the local device log. This shows only events generated on the device you're currently using — useful when troubleshooting something happening on a single phone or tablet, since it isolates that device's activity from everything else happening across your school.
For the school-wide log (every global action across all users), admins can use Settings → App Log & Reports → View App Log. See App Log (school-wide) in the next section.
Delete my user account
This removes you from your school's user list and signs you out. It does not delete the school itself or affect anyone else's account. Use it if you've left the school and want to clean up.
Refresh DB
The hamburger menu also has a Refresh DB option that forces the app to pull fresh data from the server. Most of the time the app stays in sync automatically, but if you ever see something that looks stale — a recently added family not appearing on the Walker's search, an approved user still showing as pending — tap Refresh DB and the app will re-fetch.
What happens next
The next section covers Settings & Admin, available to admins only. It includes billing, the school user list, reports, the school-wide app log, and the danger zone for deleting a school.
7. Settings & Admin
The Settings page is accessible only to admins. It manages billing, the school user list, reports, the school-wide app log, and the danger zone.
The basic Settings layout — school info, rider list, positions, and user list — was covered in Setting Up Your School. This section picks up where that left off.
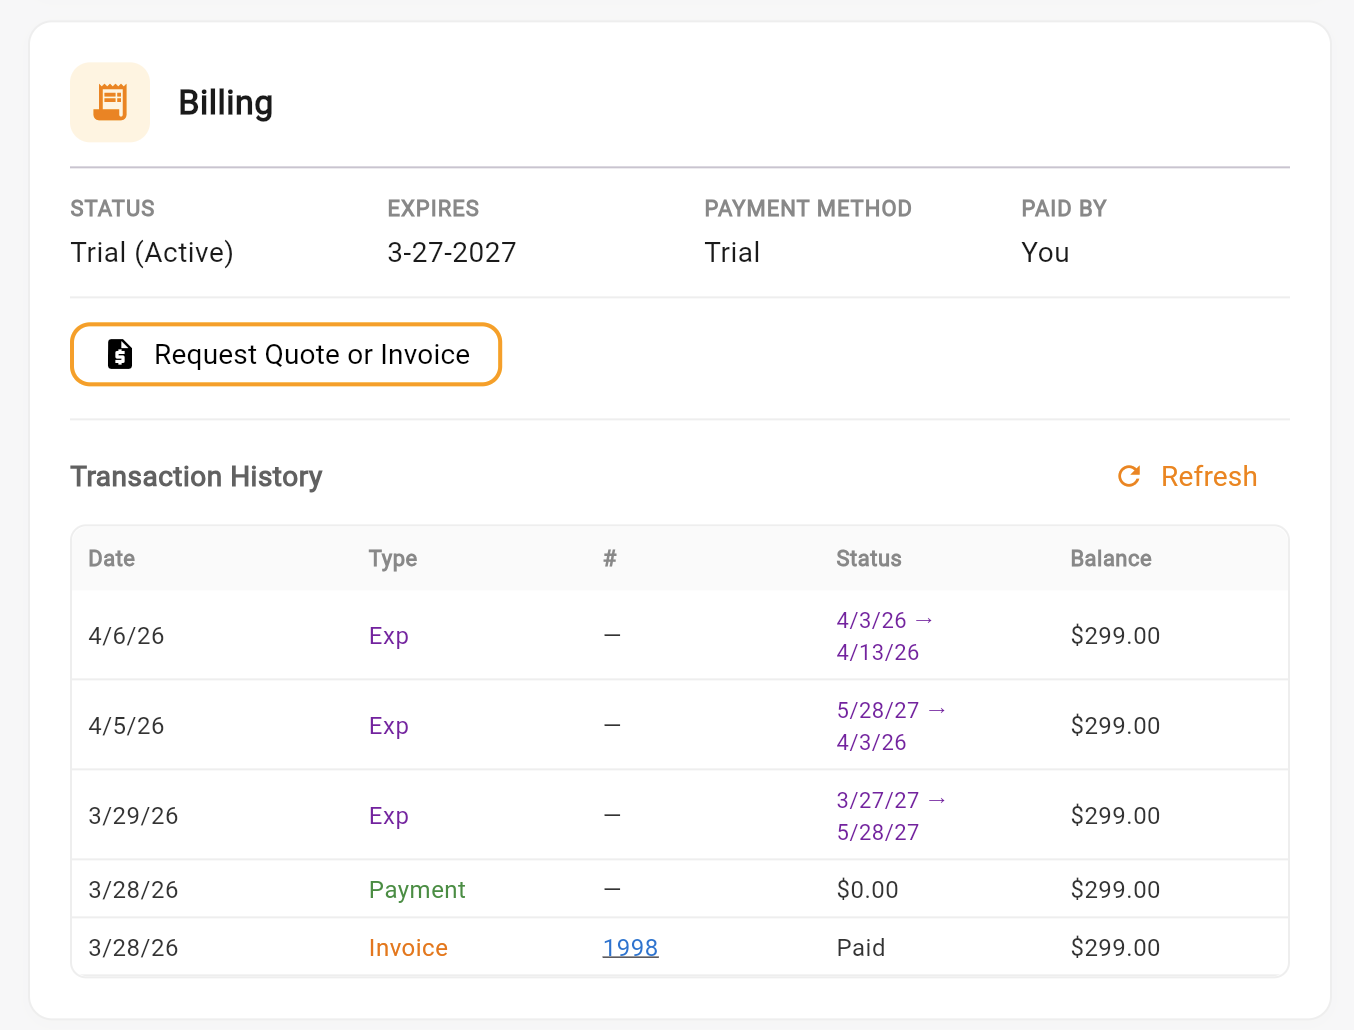
Billing & Subscriptions
The Billing card on the Settings page shows your school's subscription status and history.
Billing contact
The billing contact is the person who receives quotes, invoices, and renewal notices for your school's subscription. They don't have to be a Carline Hound user — many schools list their accounts payable department, business manager, or treasurer here, even though those people never sign in to the app.
To change the billing contact, the new contact's name and email are edited from this screen by an admin. If you're an admin and you want yourself listed as the billing contact, tap Make Me the Billing Contact. This swaps the current contact's name and email for yours. It does not transfer admin privileges or affect anyone's app access — it just changes who receives the billing emails.
Subscription expiry
The expiry date shows when your current subscription term ends. After this date the school's data isn't deleted, but the Walker role is disabled until the subscription is renewed (see Subscription expired — Walker is disabled in Troubleshooting). Other roles continue to work.
Renew directly through the app with a credit card, or tap Request Quote or Invoice (described below) if your school pays by purchase order or check.
Requesting a quote or invoice
If your school pays by purchase order or check — or you'd just like the renewal in writing before paying — tap Request Quote or Invoice on the Billing card.
You'll be asked to confirm or provide:
- The school name — usually pre-filled from your account.
- The billing contact's name, email address, and mailing address — where the quote or invoice will be sent. The billing contact doesn't have to be a Carline Hound user (see Billing contact above); many schools route this to their accounts payable department or business office.
After you submit the request, the Carline Hound team prepares the document and emails it to the billing contact.
Paying an invoice. Invoices include a payment link for paying by credit card directly online. Schools that prefer to pay by check can mail it to the address on the invoice instead.
Paying by purchase order. If your school requires a PO, request a quote first. Once your school issues the PO against that quote, Carline Hound converts the quote to an invoice, which can then be paid by credit card (via the payment link) or by school check.
Once payment is processed, the subscription is renewed automatically — there's nothing to install or restart, and any disabled Walker role is re-enabled.
Transaction history
The Transaction History table lists every billing event for your school. Columns:
| Column | What it shows |
|---|---|
| Date | When the transaction was recorded |
| Type | Invoice, Payment, or Exp (subscription expiration extension) |
| # | Reference number — usually a clickable invoice number |
| Status | Paid, pending, or the date range the line covers |
| Balance | Running balance after the transaction |
Tap an invoice number to view or download the invoice. Tap Refresh in the top-right of the card to pull the latest activity from the server.
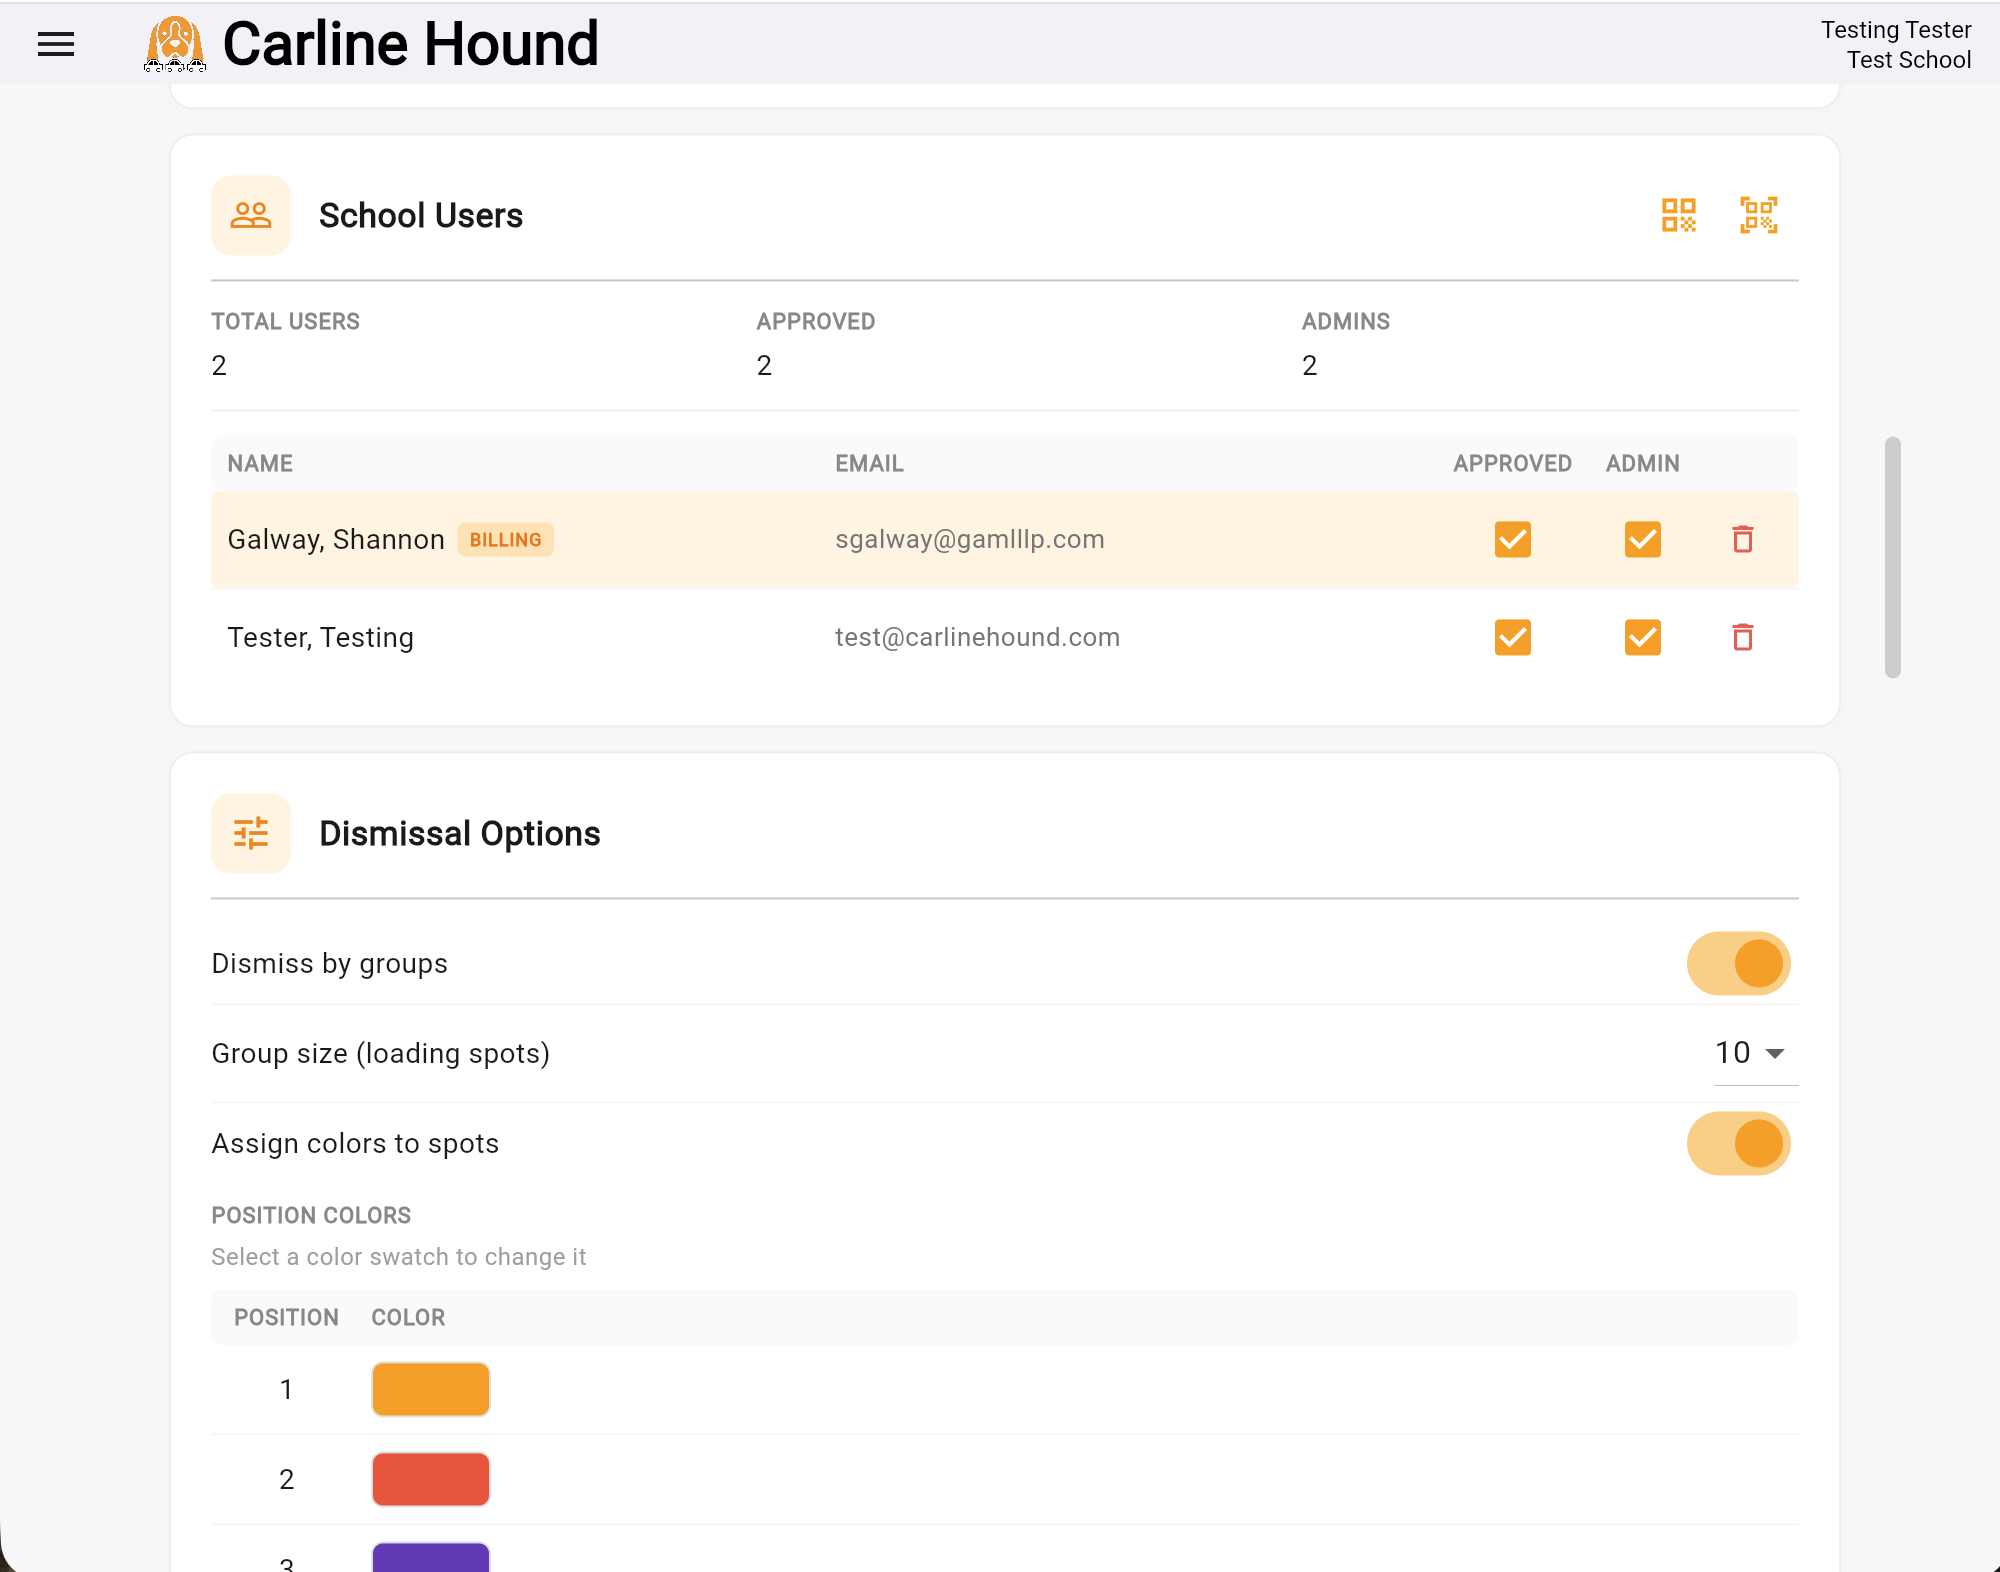
School Users
The School Users card on the Settings page is where every user associated with your school appears — approved staff, admins, and anyone whose join request is still pending. From here you approve new users, promote them to admin, demote them back, and remove people who've left.
The header of the card shows three running counts:
- Total Users — everyone associated with the school (approved and pending).
- Approved — users who've been granted access.
- Admins — approved users who also have admin privileges.
Below the counts, every user appears as a row with their name, email, and three actions on the right:
- Approved checkbox — checked means they can sign in and use the app. Uncheck to revoke access without deleting the user; you can re-approve later.
- Admin checkbox — checked means they have admin privileges (Settings, billing, rider list, user management). Uncheck to demote them back to a regular user.
- Trash icon — permanently removes the user from your school. Use this for staff who've left for good or for users who requested access by mistake.
A BILLING tag next to a user's name means that user is currently the billing contact. To change the billing contact, see Billing & Subscriptions above.
Approving a new user
When someone submits a join request — by searching for your school, scanning your school QR with Scan to Join, or showing their personal QR — they appear in this list with the Approved checkbox unchecked.
To approve them:
- Find their row in the user list.
- Tap the Approved checkbox to grant access.
- If they should be an admin (Settings, billing, rider list management), also tap the Admin checkbox.
The user is notified and can immediately use the app under whichever role(s) your school has assigned to them.
Rule of thumb: anyone who'll touch Settings is an admin. Everyone else is a regular user.
Removing access
There are two ways to take away someone's access, depending on whether you might want to restore it later:
- Uncheck Approved — the user stays in your list but can't sign in. Reversible — re-check Approved to restore access.
- Tap the trash icon — the user is removed from your school's user list permanently. Use this when someone has left for good.
If the user you're removing is currently the billing contact, change the billing contact from the Billing card first, then remove the user.
QR code shortcuts
The two QR icons in the top-right corner of the School Users card pair with the QR shortcuts users see on the Join screen. Both speed up onboarding by removing typing from the joining process.
- Display the school's QR code — show this for users to scan with Scan to Join on their device. Their app prefills your school's name; they then tap Send Join Request, which still requires your approval but skips the directory search.
- Scan a user's QR code — when a new user has tapped Show My QR on their phone, tap this icon and scan their QR code. The user's join request is approved instantly.
Tip: Use the displayed QR at scale (print it on a sign-in board, hand out paper copies, project it on a screen during a staff meeting). Use the scan flow for one-on-one onboarding when you're standing next to the new user.
Reports & Dismissal Stats
The App Log & Reports card on the Settings page has two entries:
- Statistics & Reports — aggregate numbers about your dismissals: how many cars per day, average time per dismissal, peak periods, and trends across days or weeks. Useful for end-of-year reports, comparing this year to last, or making the case for staffing changes.
- View App Log — see below.
Stats are read-only and update automatically as you run dismissals.
App Log (school-wide)
The App Log under Settings → App Log & Reports → View App Log is the school-wide event stream — every global action across the school is captured here: walker entries, dismiss and back presses, settings changes, user approvals, errors, and more. Use it when you're troubleshooting a school-level issue (e.g., a dismissal didn't behave the way you expected and you want to see exactly what was logged) or when a Carline Hound support request asks for the relevant log lines.
The school-wide log is admin-only. The per-device log accessible from My Profile → View App Log is described in Section 6, My Profile.
Danger Zone — Delete School
At the bottom of the Settings page you'll find the Danger Zone with a single button: Delete School.
Deleting a school is permanent. It removes your rider list, your user list, your transaction history, and any sub-schools created under it. This action cannot be undone, and Carline Hound staff can't recover the data afterward.
Use this only when:
- Your school is no longer using the app and you want a clean exit, or
- You created the school for testing and want to start over.
If you only need to switch which sub-school you're working with, use My Profile → Choose which list to view (Section 6) instead.
What happens next
Section 8 covers troubleshooting common issues — verification email problems, join request approvals, connection hiccups, and a few other things that can come up. Section 9 lists ways to reach Carline Hound support if Section 8 doesn't cover what you need.
8. Troubleshooting
This section covers issues that come up from time to time and how to resolve them. The most common ones come first; sign-in and admin-side issues follow. If you don't find your issue here, see Contact Us in the next section.
App isn't updating
If entries are delayed or the displays are falling behind reality, the most common cause is the Walker drifting out of Wi-Fi range while walking the carline. The Walker's device may cling to a weak Wi-Fi signal at the edge of school property instead of falling back to cellular, leaving the rest of the system waiting for entries that never arrive.
Fix: turn Wi-Fi off entirely on the Walker's device so the phone uses cellular data only. The Walker is the entry point for everything else — once that connection is stable, the Marshal, Large Display, and Classroom views catch up automatically.
Marshal, Large Display, and Classroom can stay on Wi-Fi as long as the signal is reliable where they're set up.
The dismiss list keeps jumping around
If the Marshal's NOW list seems to reorder itself, advance unexpectedly, or back up without anyone in your room pressing anything, it's almost always because another user is also on the Marshal page and pressing Dismiss or Back from a different device.
Fix: make sure only one person is on the Marshal page at a time. If two people need to operate Marshal during dismissal — for example, a primary and a backup — they should coordinate verbally so they're not both pressing buttons.
The Marshal page shares state across devices in real time, so any Dismiss or Back press from any signed-in admin propagates to every Marshal screen.
Verification email didn't arrive
When you sign up, Carline Hound sends a verification email to the address you provided. Until your email is verified, the app shows a countdown banner reminding you to verify, and after a limited number of logins it'll block further access until verification is complete.
If you didn't receive the email:
- Check your spam or junk folder. Verification messages sometimes end up there.
- Wait a few minutes — emails can be delayed.
- Check that you typed the address correctly when you signed up. If you mistyped it, sign up again with the correct address.
- If your school filters mail aggressively, ask IT to allow mail from the Carline Hound domain.
If none of those work, see Contact Us (Section 9) and we'll re-send the verification or update the address on your account.
Stuck on "Waiting for Approval"
After you tap Send Join Request, the app shows a Waiting for Approval screen. This stays in place until your school's admin approves you.
If approval is slow:
- Don't log out or close the app. Once your admin approves, the app detects it within seconds and forwards you in automatically.
- Reach out to your school's admin directly to let them know you've requested access. They can find you in their User List under Settings → School Users.
- If you and an admin are in the same room, the fastest path is Show My QR from the Join screen — the admin scans it and you're approved instantly.
- If you picked the wrong school by mistake, cancel the request and search again.
Connection drops during dismissal
Carline Hound needs an active internet connection to sync between Walker, Marshal, Large Display, and Classroom views. If a device loses connection mid-dismissal, that device's actions and screen state may stop syncing with the others until the connection returns.
Practical tips:
- Keep the Walker on cellular data when possible — Wi-Fi tends to drop near the edges of school property. (See App isn't updating above for the most common variant of this.)
- Marshal, Large Display, and Classroom can run on Wi-Fi as long as the signal is reliable in their location.
- After connection returns, if anything still looks stale, tap Refresh DB from the hamburger menu. If a Walker entry seems to have been lost, re-enter it.
QR code won't scan
If a QR code isn't scanning:
- Lighting — make sure the QR is well-lit and in focus. Glare on a phone screen or shadow on a printed code can throw off the scanner.
- Camera permission — Carline Hound needs permission to use your camera. Check the app's permissions in your device's Settings if scanning never activates the camera.
- Distance and angle — hold the phone 6–12 inches from the QR with the camera squared up. Move closer or farther to find focus.
- Code damage — if a printed QR is scratched, smudged, or partially covered, ask your admin to print a fresh one.
- Wrong QR for the action — Scan to Join scans the school's QR (from the admin). Scan a user's QR code (admin side) scans a user's personal Show My QR code. They aren't interchangeable.
If everything looks right and it still won't scan, fall back to searching for the school by name on the Join screen, or have the admin approve the user manually.
Subscription expired — Walker is disabled
If your school's subscription has expired, the Walker role is disabled. Other roles — Line Marshal, Large Display, Classroom — keep working, but no new entries can be added because the Walker is the entry point. In practice that means dismissal can't run until the subscription is renewed.
To re-enable the Walker:
- Renew the subscription directly through Settings → Billing.
- If your school pays by purchase order or check, request a quote or invoice from the same screen and forward it to your accounts payable contact (the billing contact, which doesn't have to be a Carline Hound user, will receive the renewal correspondence).
Once payment is processed, the Walker unlocks automatically — there's nothing to reinstall or restart.
Walker is locked (10-minute inactivity lockout)
This is a different lockout from the subscription one above. If a previous Walker enters the Walker screen and doesn't leave it — closes the app mid-shift, walks away without backing out, or just stays on the screen — the next person who tries the Walker role sees a Walker Locked dialog.
Resolutions:
- Wait — the lock auto-releases after 10 minutes of inactivity in the Walker screen.
- Faster — an admin can release the lock immediately from Settings → Dismissal Options → Walker Lock → Release Walker Lock.
Rider list won't upload
If the Excel .xlsx upload fails, the most common causes (in rough order of frequency):
- Formulas in cells. The file must contain plain values only.
=A1+1(or any other formula) will reject the upload. Type values directly, or use Excel's drag-fill on plain values to extend a series. - Duplicate rider numbers. Two rows can't share the same number. Sort column A in your spreadsheet to spot duplicates before re-uploading.
- Non-digit characters in column A. The number column accepts digits 0–9999 only — no letters, dashes, or spaces.
- Wrong column order. The app reads by column position, not by header text. Column A must be the rider number, column B the name shown to the Marshal, columns C onward the teacher names. Headers in row 1 are optional and their wording doesn't matter.
- Mobile file picker can't see the file. On iOS or Android, the file picker reaches into cloud storage. Save your
.xlsxto iCloud, Google Drive, Dropbox, or local device storage so the picker can access it. Webview users can pick the file directly from their computer.
After fixing the issue, retry the upload. The app will overwrite the existing rider list (with a confirmation prompt).
Data looks out of date
If you see something stale — a recently added family not appearing on the Walker's search, an approved user still showing as pending, your sub-school list missing a recent addition — the device's local cache may not have caught up with the server.
- Tap Refresh DB from the hamburger menu. The app re-fetches the latest data.
- If the issue persists after a refresh, sign out and back in.
- If it still persists, capture the local app log (My Profile → View App Log) and contact support.
What happens next
If none of the above resolves your issue, Section 9 (Contact Us) has the ways to reach Carline Hound support.
9. Contact Us
If you've worked through Troubleshooting and still need help — or you'd like to ask a question, send feedback, or arrange something the app doesn't cover (an unusual subscription situation, billing question, etc.) — get in touch with the Carline Hound team.
Email: support@carlinehound.com
Phone: (979) 217-1234
We aim to respond to email the same day during typical US school hours. Outside school hours and on weekends, expect a slower turnaround.
When you write in, including the following details helps us help you faster:
- Your school name as it appears in Carline Hound.
- The role you're using when the issue happens (Walker, Marshal, Large Display, Classroom, or Settings).
- The device and browser (e.g., iPhone running iOS 17, or Chrome on Windows 11).
- A short description of what you expected to happen and what actually happened.
- For admin-side issues, the relevant App Log lines: Settings → App Log & Reports → View App Log (school-wide), or My Profile → View App Log (this device). Copying a few minutes around the issue is usually plenty.
For everyday issues, the Need help? Contact Us link at the bottom of the sign-in screen is the same as emailing the address above.